Anim Tools
Living Document
This documentation is living, in that it will continue to get updated based on user feedback, with the goal being to continually increase clarity and coverage.
Introduction
Overview
Blueprint and C++
Knowledge of C++ is NOT required to leverage the capabilities of this plugin.
The Anim Tools (AT) plugin --- previously named MoCap Tools (MCT) --- is a powerful framework for programmatically processing and modifying UAnimSequence assets within the Unreal Engine. It can be purchased on Epic's Fab Marketplace.
Some of the key features are listed below.
- Bulk Animation Processing: Modify multiple AnimSequences at once.
- Custom Operations: Create user-defined Operations (
UATBaseOperation) --- the actions applied toUAnimSequenceassets --- in either C++ or Blueprint. This means users are not limited to whatever Operations are shipped with the plugin. - Non-Destructive Workflow: Preview changes before applying them and choose whether to overwrite existing assets or generate new ones.
- Per-Animation Property Control: Configure Operation properties differently for each AnimSequence.
Requirements
The Anim Tools plugin is supported for Unreal Engine 5.6+. (The predecessor, Mocap Tools, which is the original form of this plugin, is supported for engine versions 5.4 and 5.5, but no further updates will be provided for MoCap Tools.)
Installation
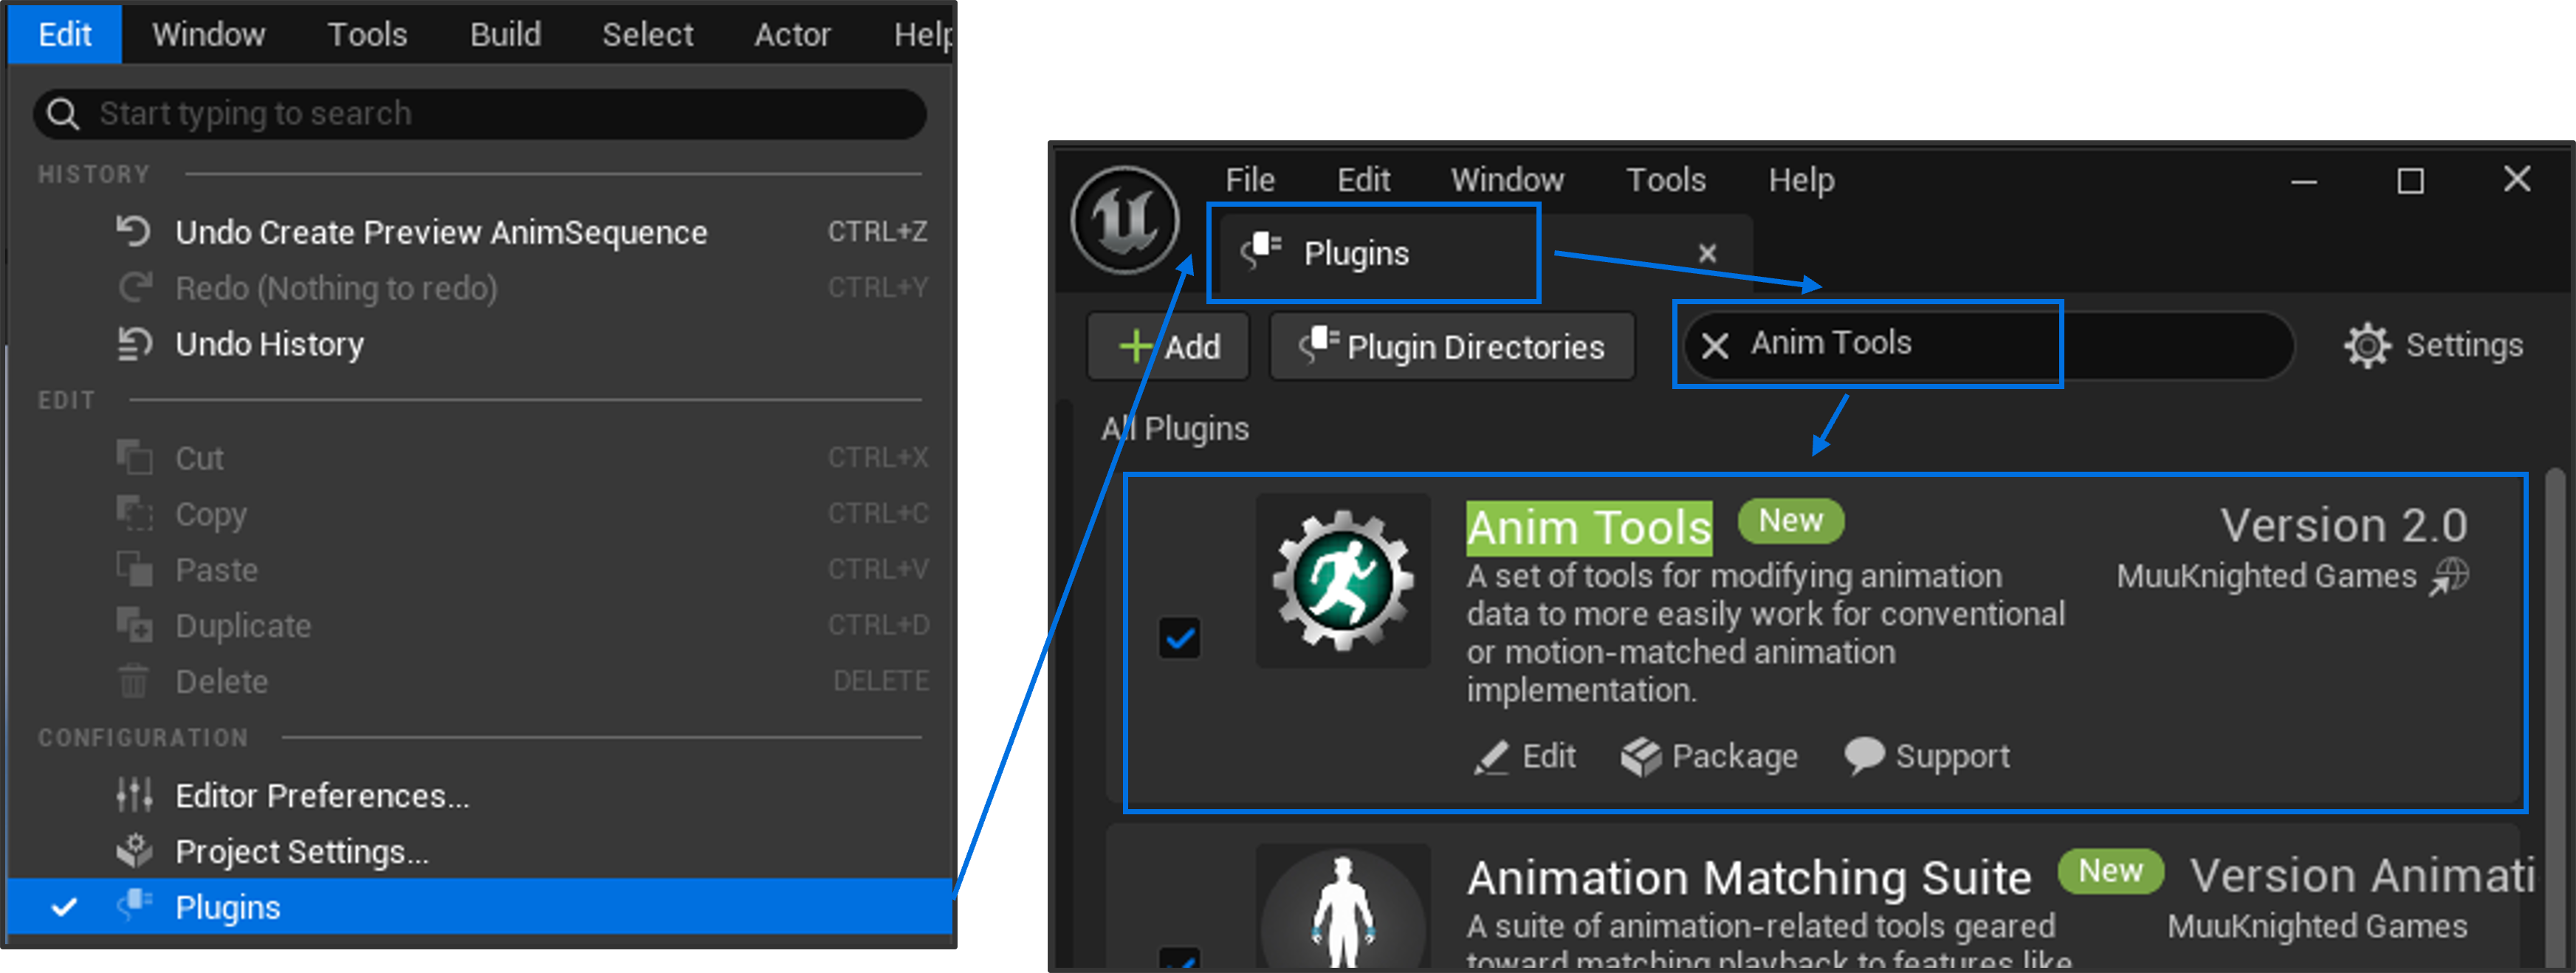
To install the plugin, either bring it into the project via the Epic Launcher or drag and drop the plugin into the project's Plugins folder. Once installed, enable the Anim Tools plugin within the Editor by selecting to Edit->Plugins. In the Plugins window, type Anim Tools, then click the checkbox and follow the prompt to restart the Editor.
Quick-Start Guide
-
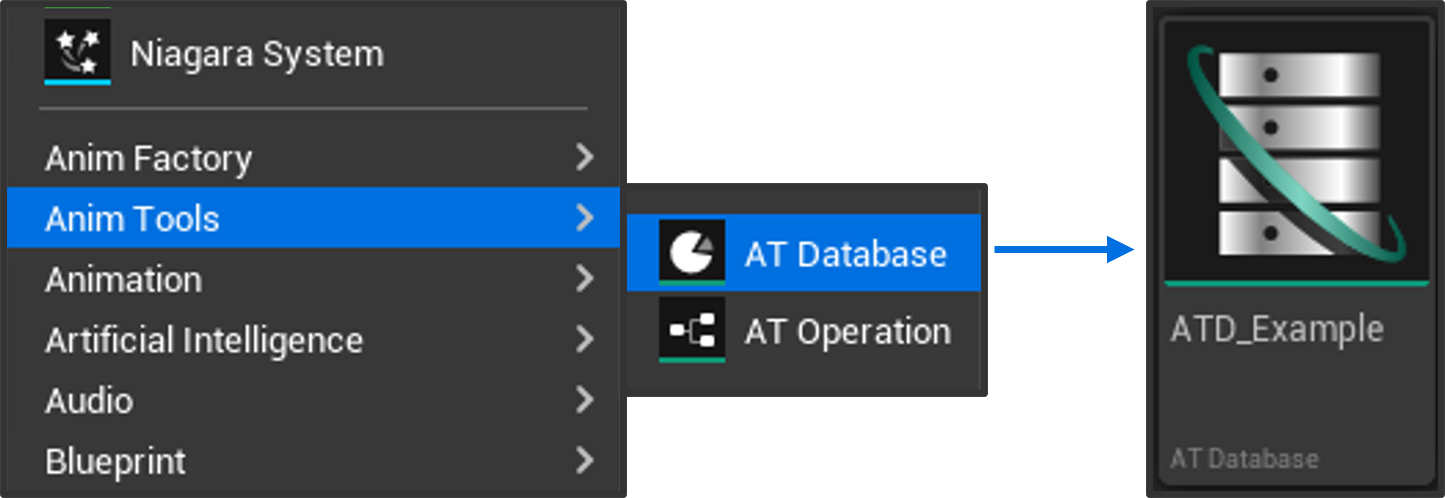
Create a Database: Right-click in the Content Browser, select Anim Tools, then click on ATDatabase. Name the asset appropriately, then double-click on it to open it.
Each database will hold the AnimSequences to be acted upon and the Operations to perform those actions.
-
Populate the Animation List: Add
UAnimSequenceassets to the Animation List by either performing a drag-and-drop or by pressing the Add button.
-
Set the Configuration: In the Configuration tab, set the output details, mesh orientation, and bone references. The latter two are in reference to the skeleton of the
UAnimSequenceassets already placed within the Animation List.
-
Add Operations: Add Operation assets to the Operation List tab by selecting from the default Operations shipped with the Anim Tools plugin. (The process for creating a custom Operation --- a child of
UATBaseOperation--- will be shown later.) Edit the details on either a bulk or per-animation basis.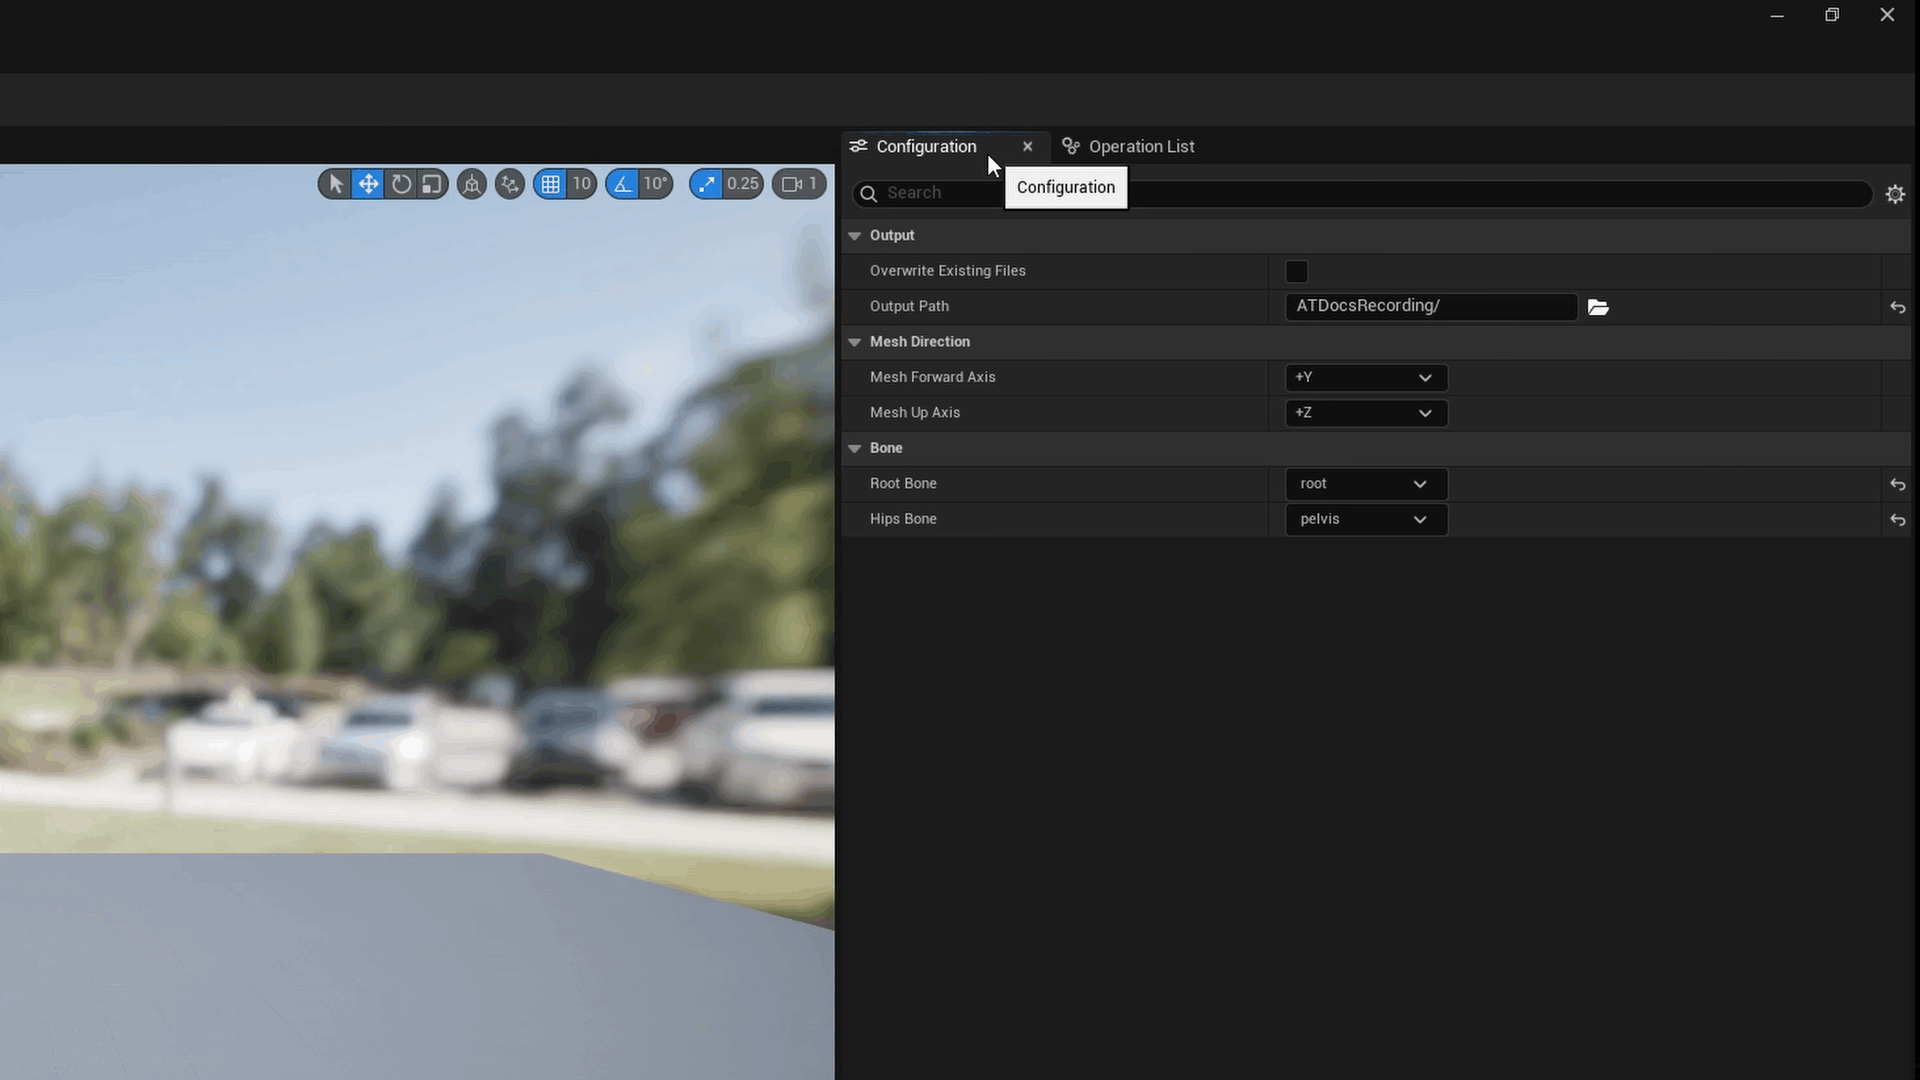
-
Preview the Edited Animations: In the toolbar at the top of the viewport, switch from Original to Edited to preview what the output animations would look like. (This is non-destructive, of course.) To have Animations displayed properly, ensure
bEnableRootMotion = trueandbForceRootLock = truein all corresponding Anim Sequences.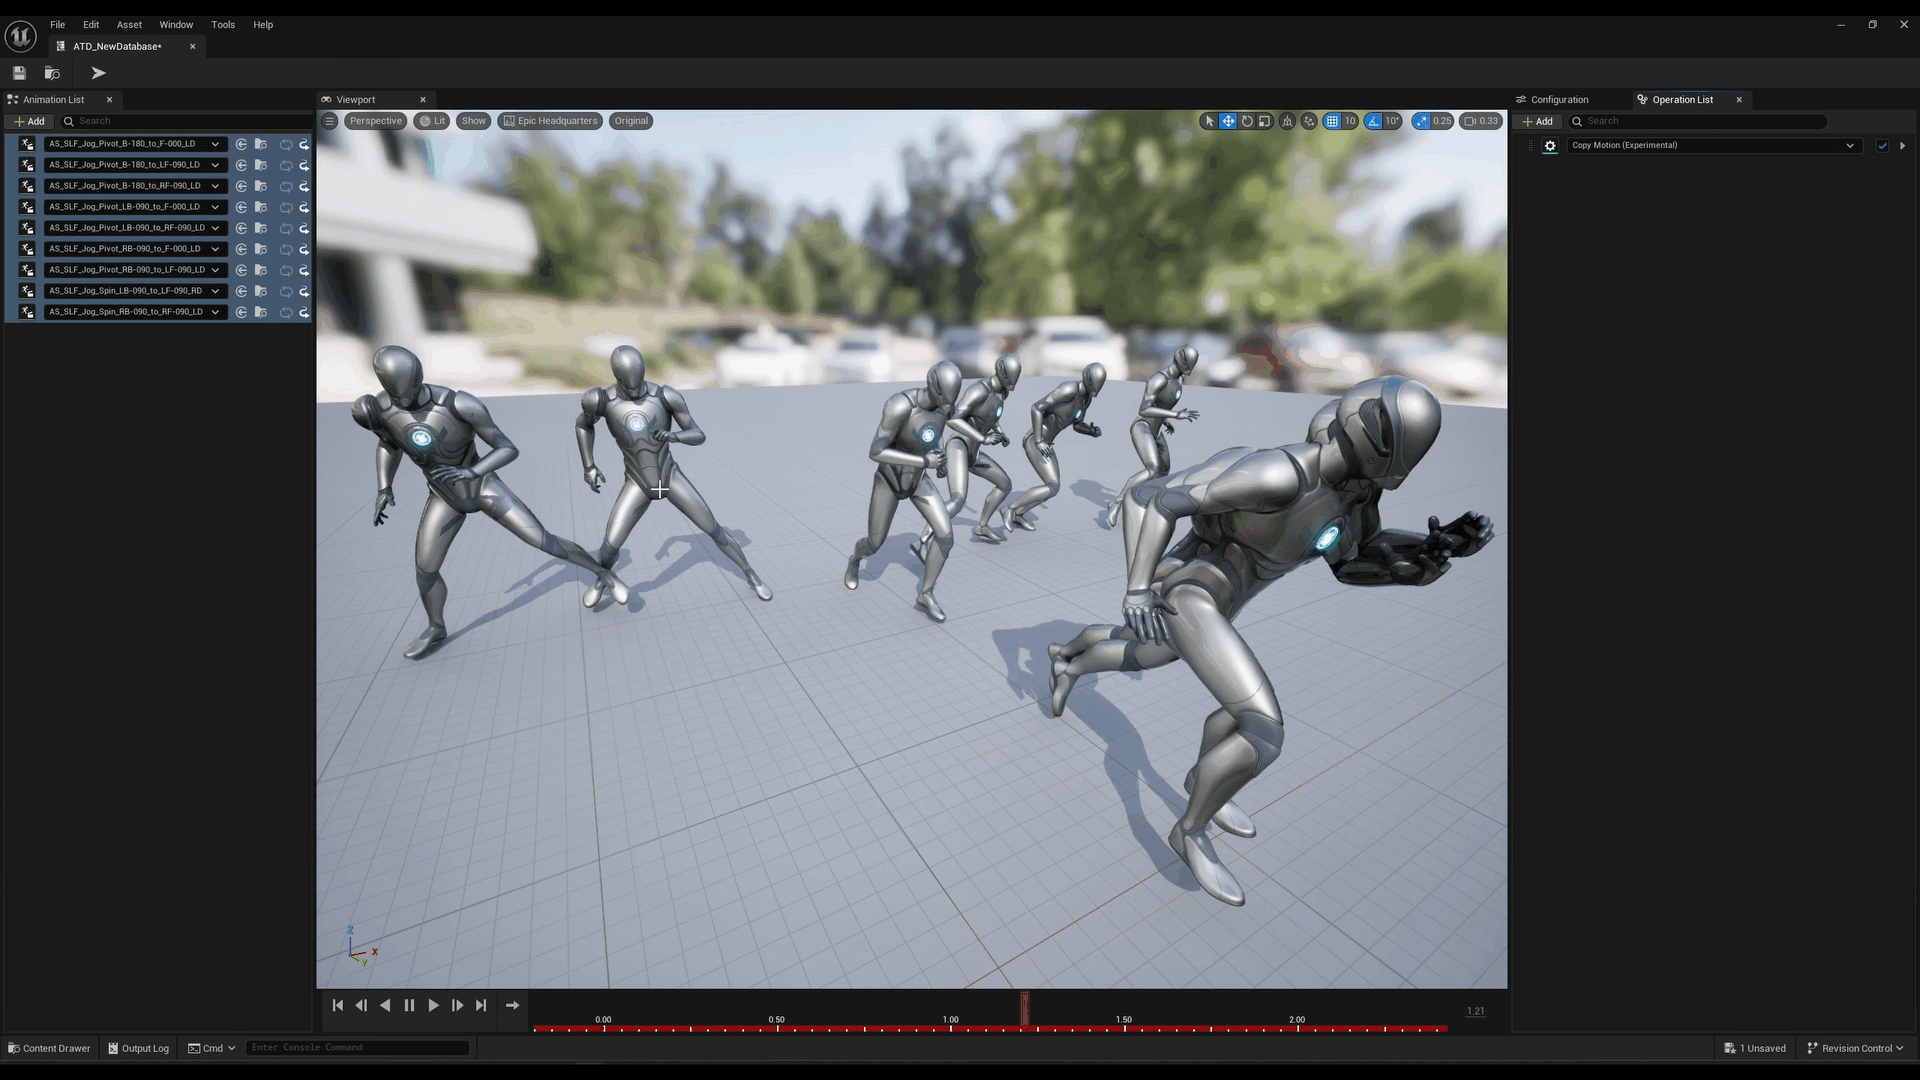
-
Press Apply: If everything looks as desired, press Apply to finalize the changes.
Core Concepts
Database
 The AT Database (
UATDatabase) is the central asset in Anim Tools. It organizes everything needed to batch-process animations: the list of animations to modify, the list of Operations to apply to those animations, and general configurable settings.
To create one, right-click on the Content Browser, hover over Anim Tools, then select AT Database. From left to right, the tabs shown are the Animation List, Viewport, Configuration, and Operation List List. (Note: by default, the Configuration and Operation List tabs will share the same space.)
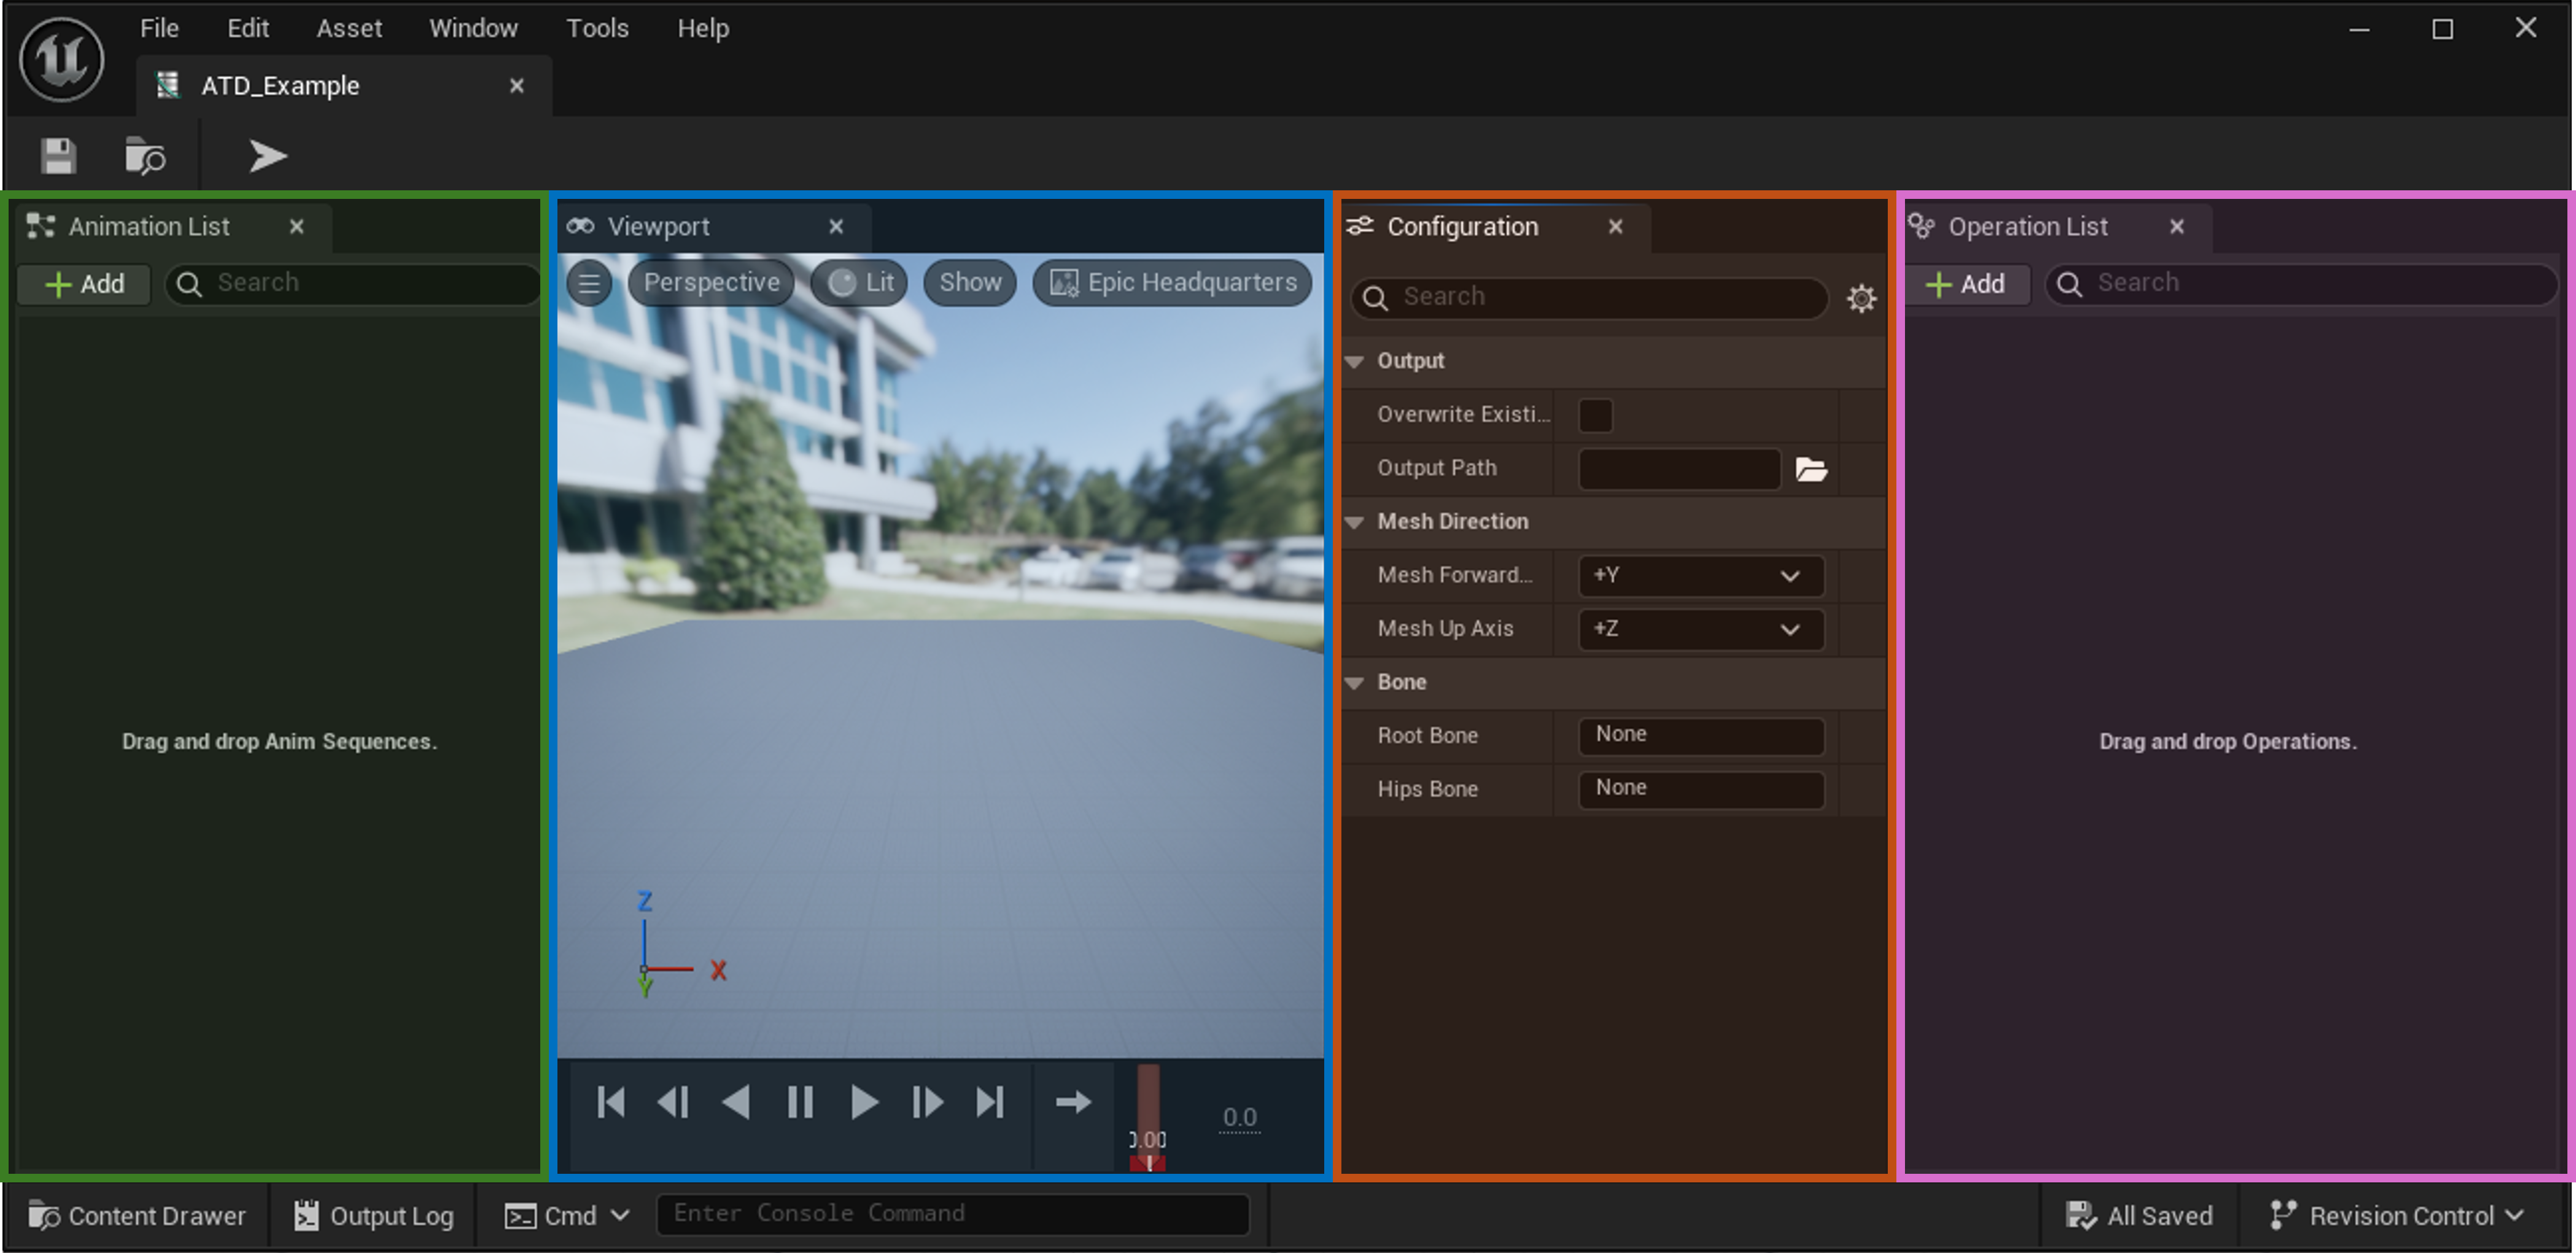
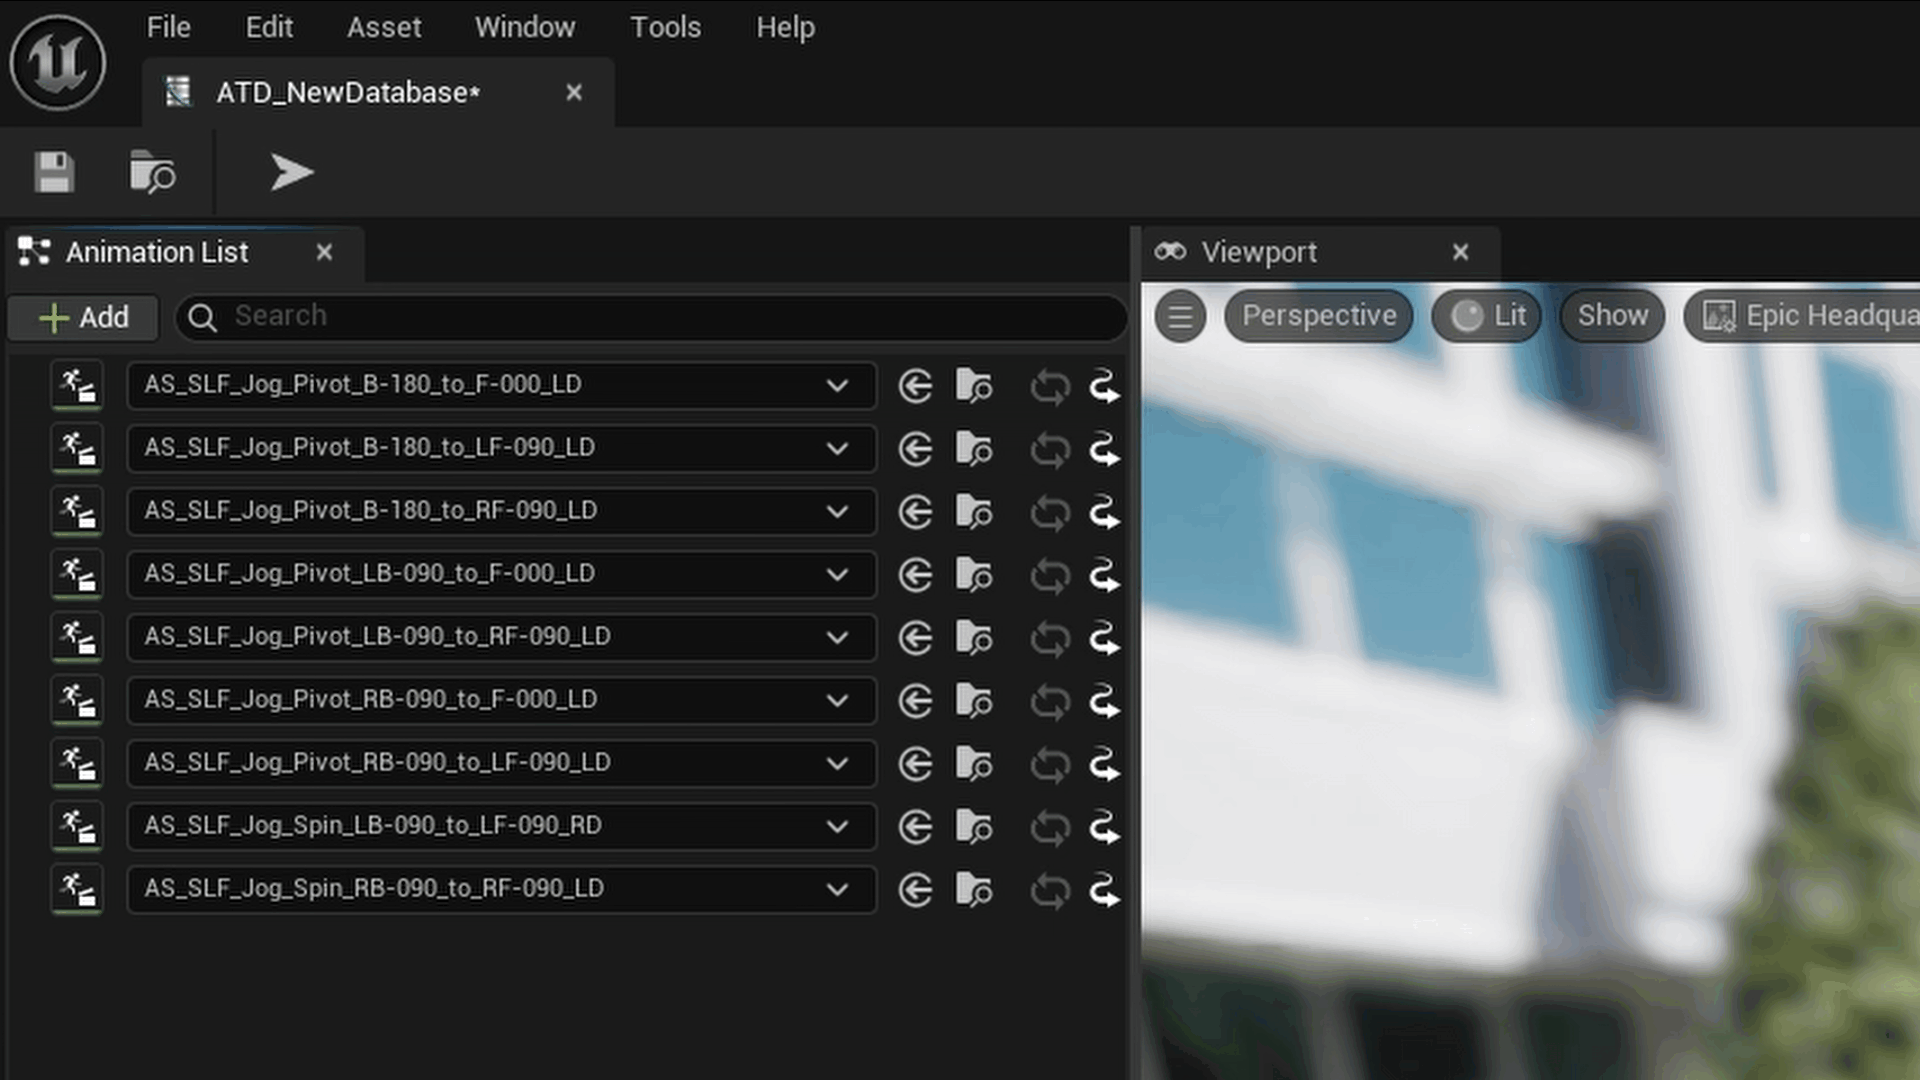
The Animation List tab will hold all the Anim Sequence (UAnimSequence) assets that are to be modified. They can be added by pressing the Add button or by doing a drag-and-drop. Once an Anim Sequence is placed into the list, the underlying skeleton (USkeleton) of the Database will be automatically set, and any functionality requiring a skeleton will read from that set skeleton. For example, any further Anim Sequences added to the list must be of the same skeleton as the currently existing Anim Sequences within the list.
Enable Root Motion
To have Animations displayed properly in the viewport, ensure bEnableRootMotion = true and bForceRootLock = true in all corresponding Anim Sequences.
The Viewport tab is, unsurprisingly, the preview port displaying currently selected Anim Sequences. Not all Anim Sequences within the Animation List will be displayed in the Viewport; only selected Anim Sequences within the list will be displayed. (To select multiple assets at once, use either Shift + Click or Ctrl + Click.)
The Configuration tab contains general settings. The Output section details whether the modified Anim Sequences should overwrite existing assets (in place) or write to newly created Anim Sequences within a user-specified directory. The Mesh Direction section requires the user to specify two axes.
- Mesh Forward Axis: the axis of the root along which the mesh, in its reference pose, faces forward. (For the UE5 Manny, for example, this is the
+Yaxis.) - Mesh Up Axis: the axis of the root, in the reference pose, pointing vertically upward along the mesh. (For the UE5 Manny, for example, this is the
+Zaxis.)
The Bone section should be populated with the appropriate Root and Hips bones, which would, for example, be the root and pelvis bones in the UE5 Manny. NOTE: The Mesh Direction and Bone sections may not be absolutely necessary; however, they are currently used in some of the Operations shipped with Anim Tools, so they must be filled out.
The Operation List tab will hold all the Operations (UATBaseOperation) to be applied to the Anim Sequences. Operations are the mechanism by which the Anim Sequences are modified. They can be created in either C++ or Blueprint, and they are applied in sequential order (i.e. in top-down order). To add Operations, press the Add button or drag and drop them into the window. Reordering can be performed by a simple click-and-drag.
Animation
When an Anim Sequence (UAnimSequence) asset is added to the Database, Anim Tools doesn't work directly with the Anim Sequence --- not at first, at least. Instead, it creates a UATAnimation "wrapper," which essentially acts as a sort of "working copy" that does the below.
- Reads data from the original
UAnimSequenceto populate its own member variables. - Stores that data in a format optimized for manipulation.
- Tracks all changes made during processing (via Operations).
- Writes the modified data back to the original
UAnimSequence(or a copy) to create the final output.
This wrapper is what makes the non-destructive workflow possible --- the original Anim Sequences remain untouched unless the option to overwrite them is explicitly chosen.
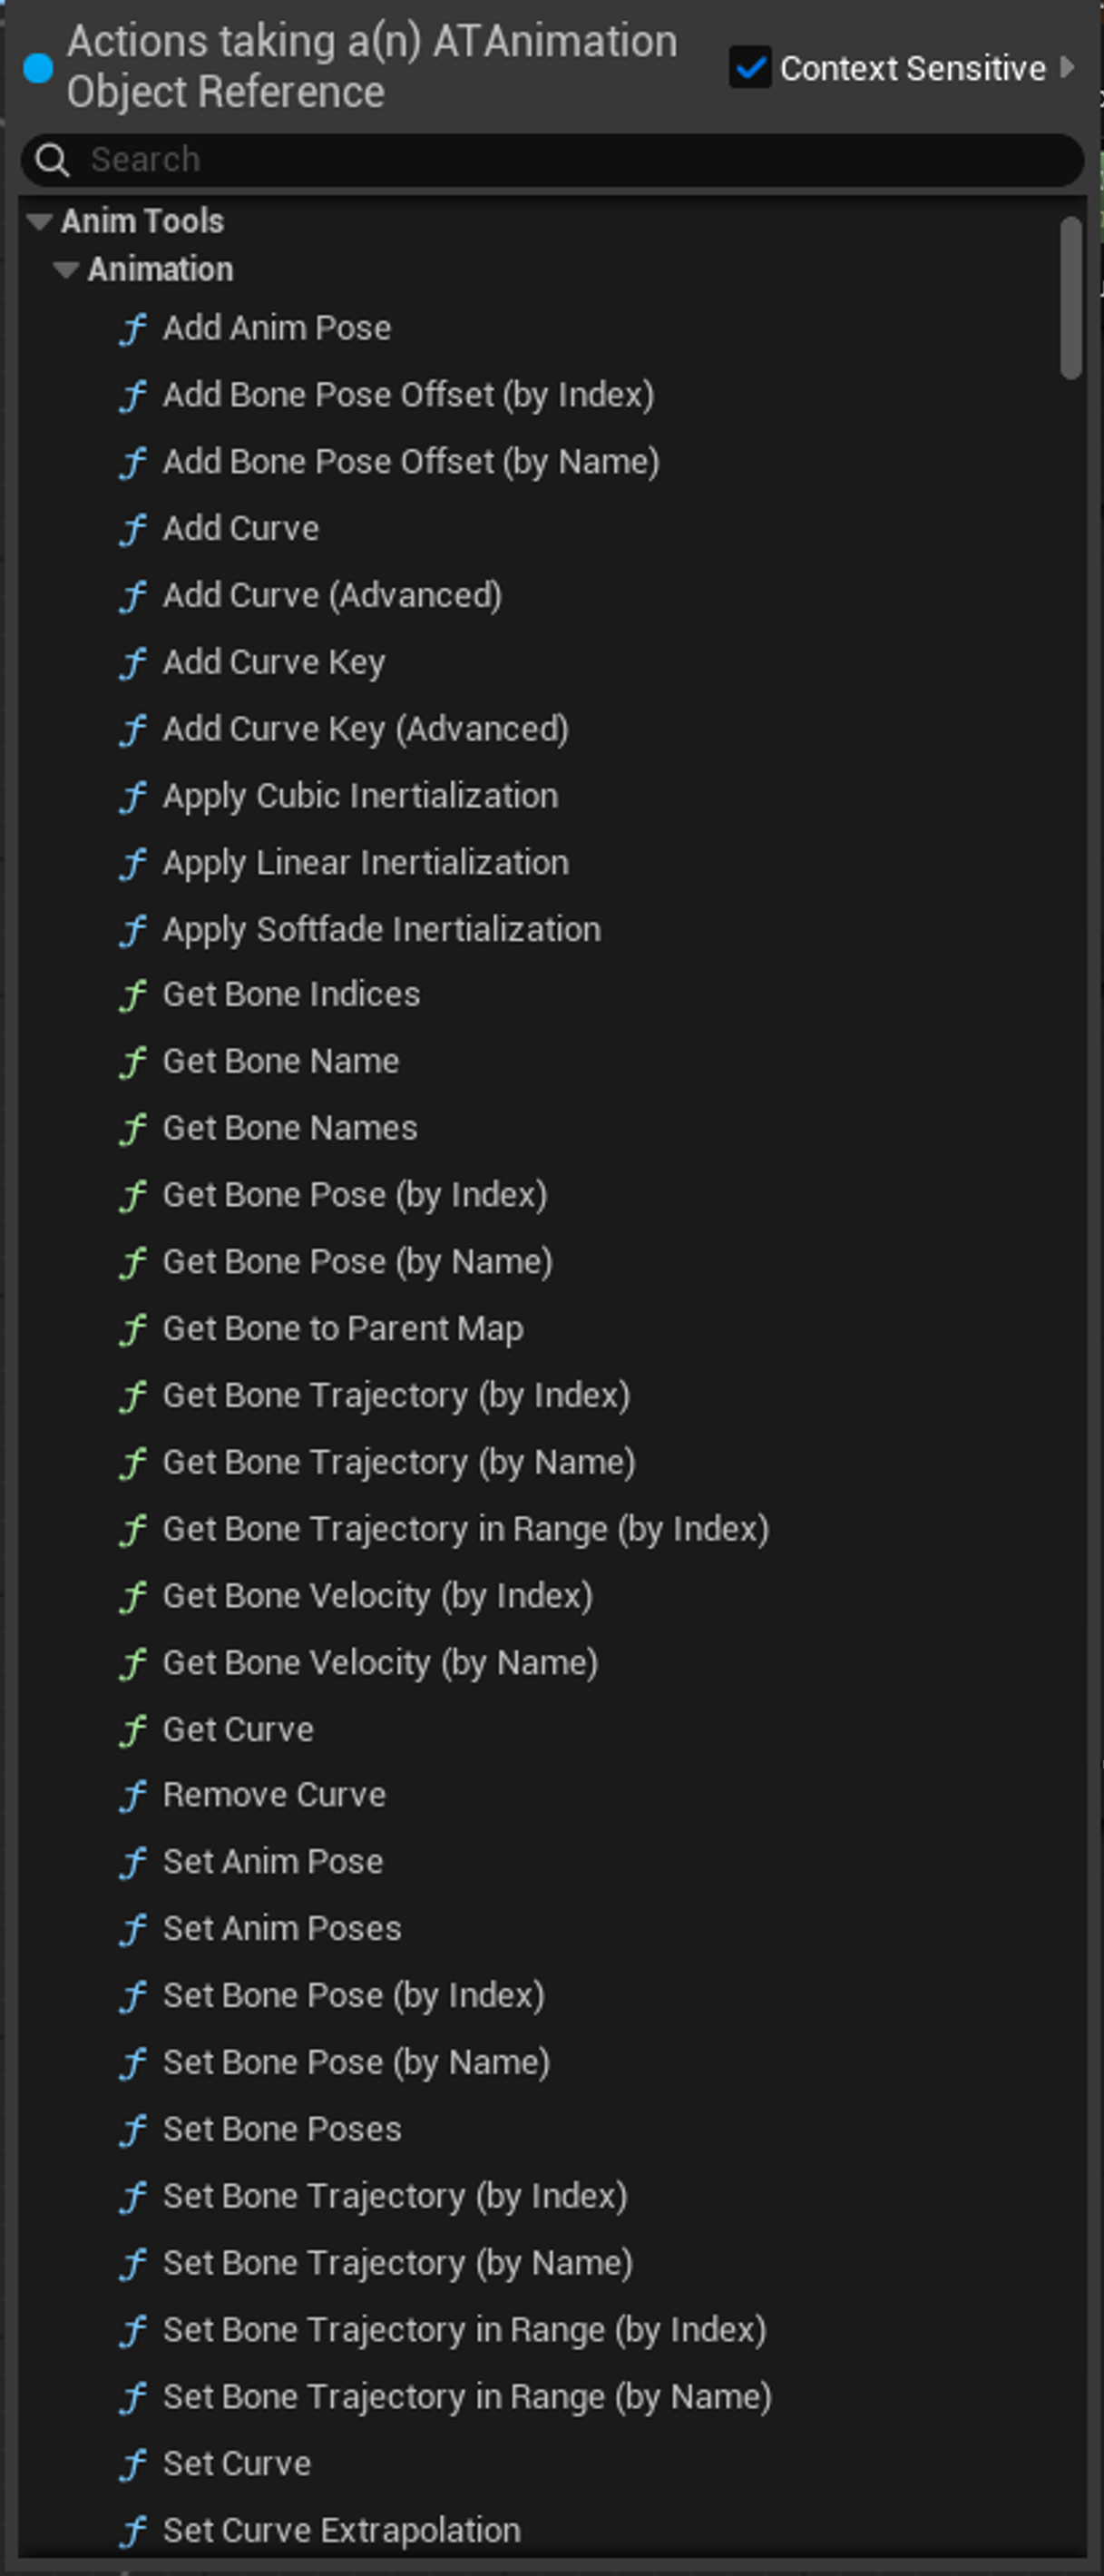
The Animation (UATAnimation) is the class that will be interacted with by the user within an Operation. There are many functions built into the class to facilitate easy and intuitive modification of the data. Functions like the simple GetBonePoseByName and SetBonePoseByName are two that will likely get the most use, but, as can be seen in the picture to the right, there are many default functions --- and more can be added upon reasonable request.
Operation
An Operation is a reusable, configurable action applied within the Database to modify Anim Sequence assets --- via modification to the wrapper UATAnimation. All Operations inherit from the base class UATBaseOperation and can be created in either C++ or Blueprint.
In C++, the below is an example of the basic setup with the three virtual functions to override.
UCLASS(Blueprintable, DisplayName = "Example Operation")
class UATExampleOperation : public UATBaseOperation
{
    GENERATED_BODY()

public:

    UATExampleOperation(); // overwrite the Description member variable here

    //=== Base Operation ===
    virtual void AnalyzeAnimationSet_Implementation(const TArray<UATAnimation*>& Animations, const UATConfigurationTab* Configuration);
    virtual void Execute_Implementation(UATAnimation* Animation, const UATConfigurationTab* Configuration, const int32 AnimIndex) override;
    virtual void ConfigureAutoBindings_Implementation() override;
    //======================

    // place member functions and variables here
}
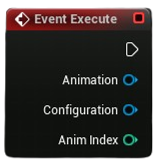
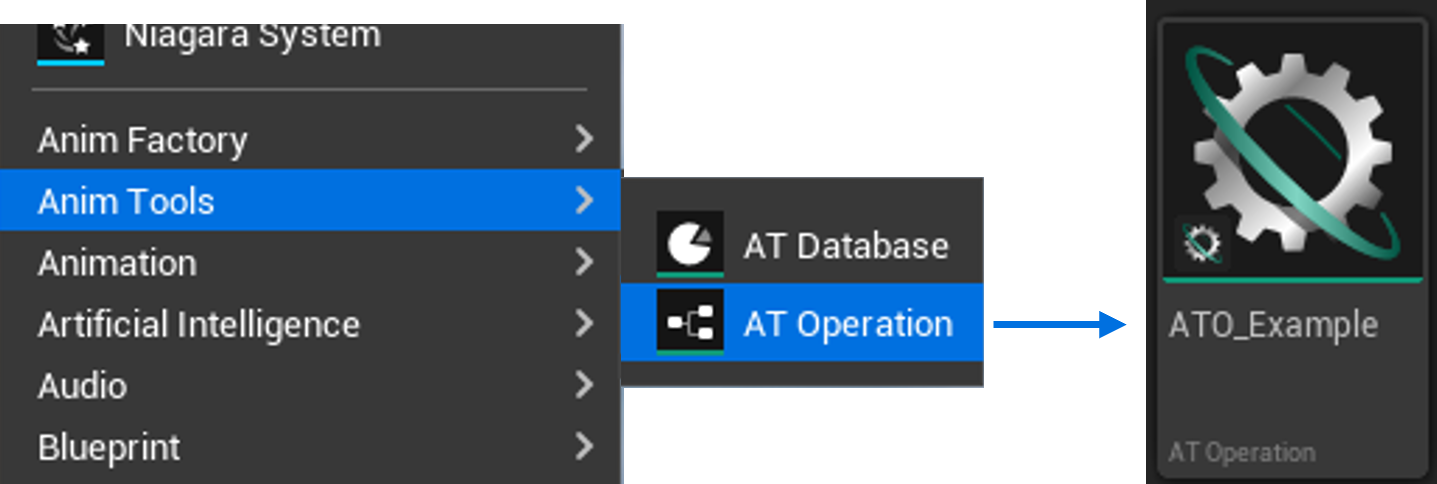 In Blueprint, an Operation is created by right-clicking on the Content Browser, hovering over Anim Tools, then selecting AT Operation. As with the C++ variant, there are three overridable functions:
 AnalyzeAnimationSet, Execute, and ConfigureAutoBindings. The first two are Events in Blueprint, and the third is a function to be overridden in the usual way.
Let us take a moment to explain these three functions.
Main Functions
Analyze Animation Set
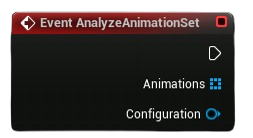
This optional function is called once before any Animations (UATAnimation) are modified. Notice the three properties: Animations and Configuration.
- The
Animationsis aconstarray of Animations (i.e.TArray<UATAnimation*>). Theconstmeans the Animations will not be modified, but they can be read from. - The
Configurationis the pointer to the Configuration tab, allowing users to conveniently access data set there.
Since the AnalyzeAnimationSet function receives the entire list of Animation to be processed, it grants users the freedom to examine all Animations as a group to, for example, extract global statistics (i.e. averages, min/max, etc), validate the Animations meet certain criteria, store shared data all Animations will need, etc. It is called before Execute, as shown below.
    User clicks "Apply"
        ↓
    AnalyzeAnimationSet (runs once, sees all Animations)
        ↓
    Execute (runs for Animation 1)
        ↓
    Execute (runs for Animation 2)
        ↓
    Execute (runs for Animation 3)
        ↓
    ... and so on
Execute function, the AnalyzeAnimationSet function can be left alone; it does not need to be overridden.
To see an example of how AnalyzeAnimationSet is used in practice, look at the code for the Retime Anims for BlendSpace (i.e. UATRetimeOperation) Operation shipped with Anim Tools.
Execute
Execute is the heart of the Operation. It is called once per Animation and is where the user modifies the Animation data: bone, curve, sync marker, etc. data. These modifications will then be taken and baked into Anim Sequence assets.
Notice the three properties: Animation, Configuration, and AnimIndex.
- The
Animationis the current Animation (UATAnimation*) being modified. All adjustments made to this Animation will carry over to the Anim Sequence assets. - The
Configurationis the pointer to the Configuration tab, allowing users to access data set there. - The
AnimIndexcorresponds to the index of the current Animation within the Animation List tab (which is zero-based, of course).
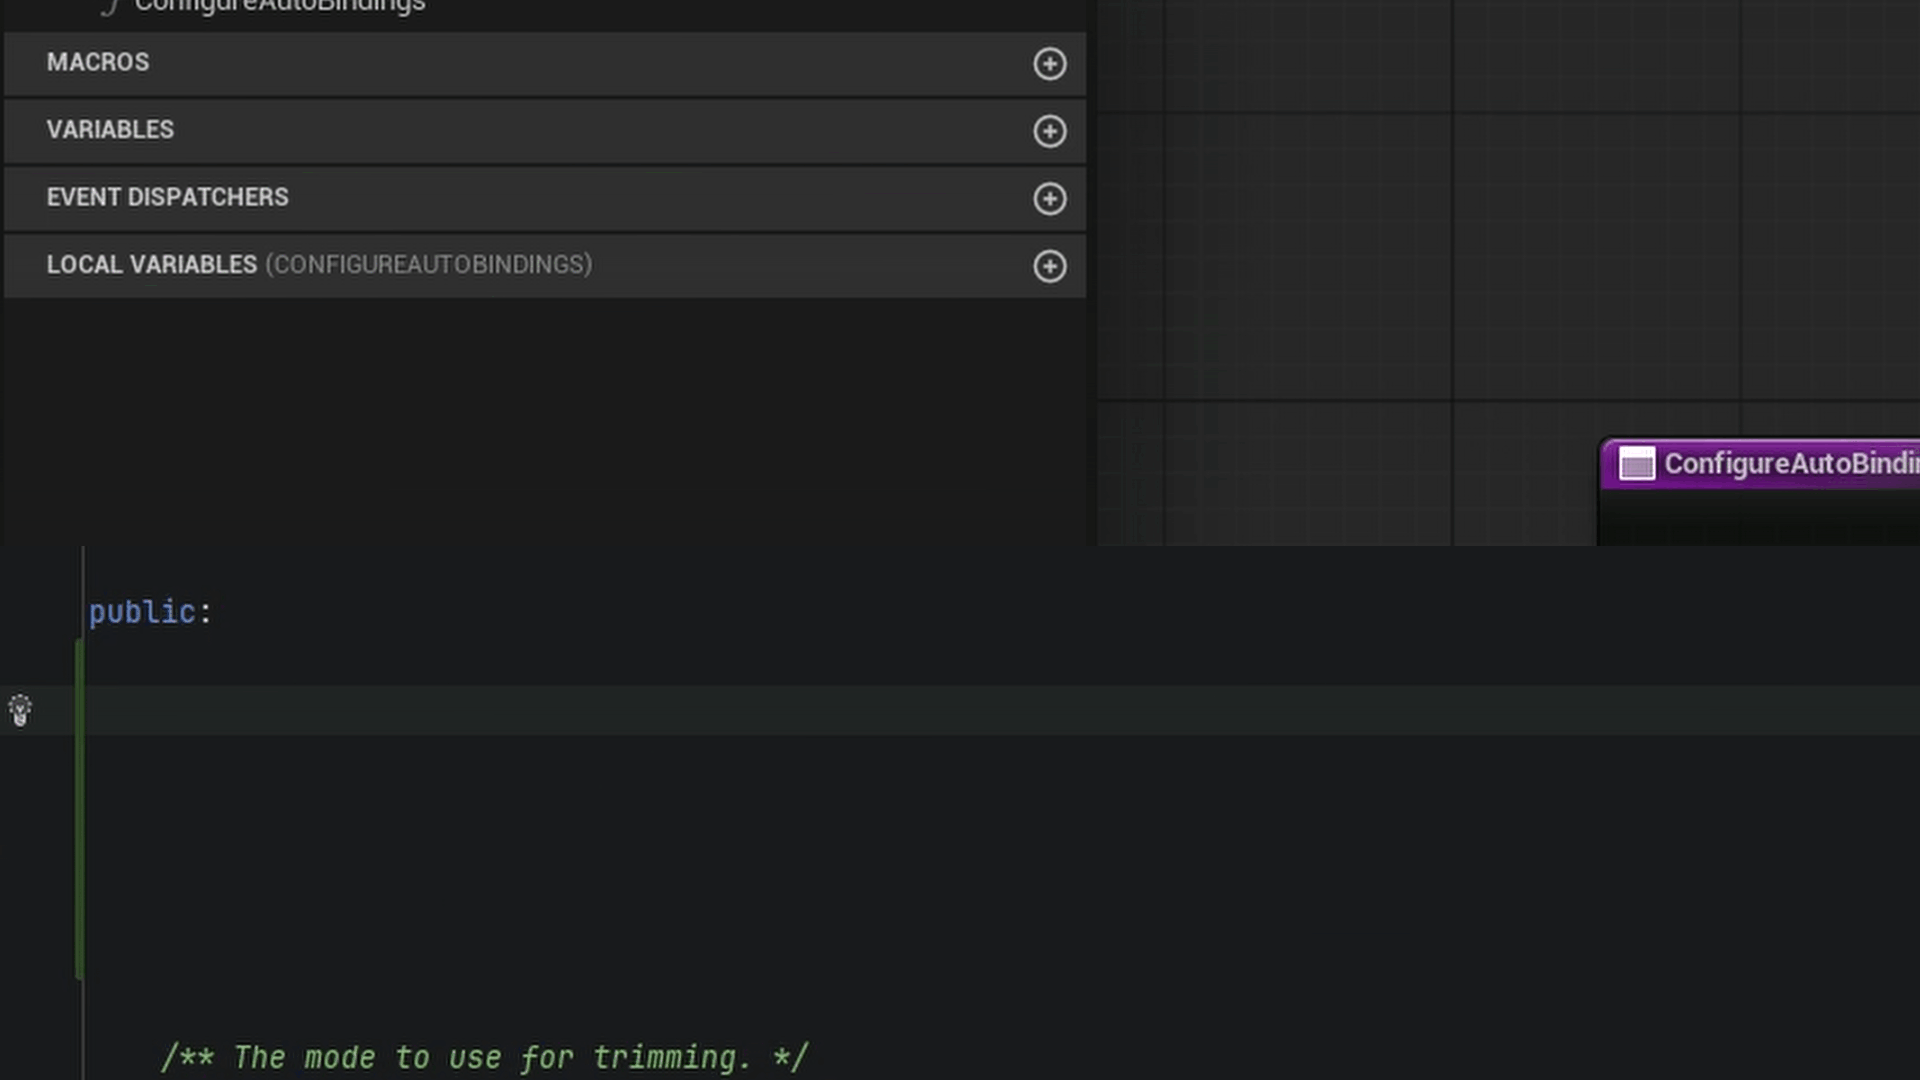
Configure Auto-Bindings
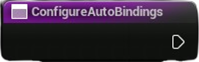
The ConfigureAutoBindings is an optional override that allows the user to establish automatic bindings placed upon class properties when those class properties are per-Animation editable. (More on per-Animation editability is discussed in a later section.) To make use of ConfigureAutoBindings, the user must call one or both of the following functions: BindFunctionToProperty and BindPropertyToProperty. These functions do the work of facilitating the bindings.
For example, in the Trim Operation (UATTrimOperation) class, the TrimPoint member variable, which is of type int32, should only be allowed to have values between 0 and NumOfAnimKeys - 1; otherwise, TrimPoint will be beyond the bounds of the Animation. (An Animation cannot be trimmed at a point beyond its boundaries.) To ensure the UI reflects this boundary, the ConfigureAutoBindings function is used, and the BindFunctionToProperty function is called twice to ensure the GetTrimPointMin function and GetTrimPointMax function are both bound to the TrimPoint property. In C++, this would looks as shown below.
void UATTrimOperation::ConfigureAutoBindings_Implementation()
{
    BindFunctionToProperty(GET_MEMBER_NAME_CHECKED(UATTrimOperation, TrimPoint), EATPropertyBindingType::MinValue, FName(TEXT("GetTrimPointMin")));
    BindFunctionToProperty(GET_MEMBER_NAME_CHECKED(UATTrimOperation, TrimPoint), EATPropertyBindingType::MaxValue, FName(TEXT("GetTrimPointMax")));
}
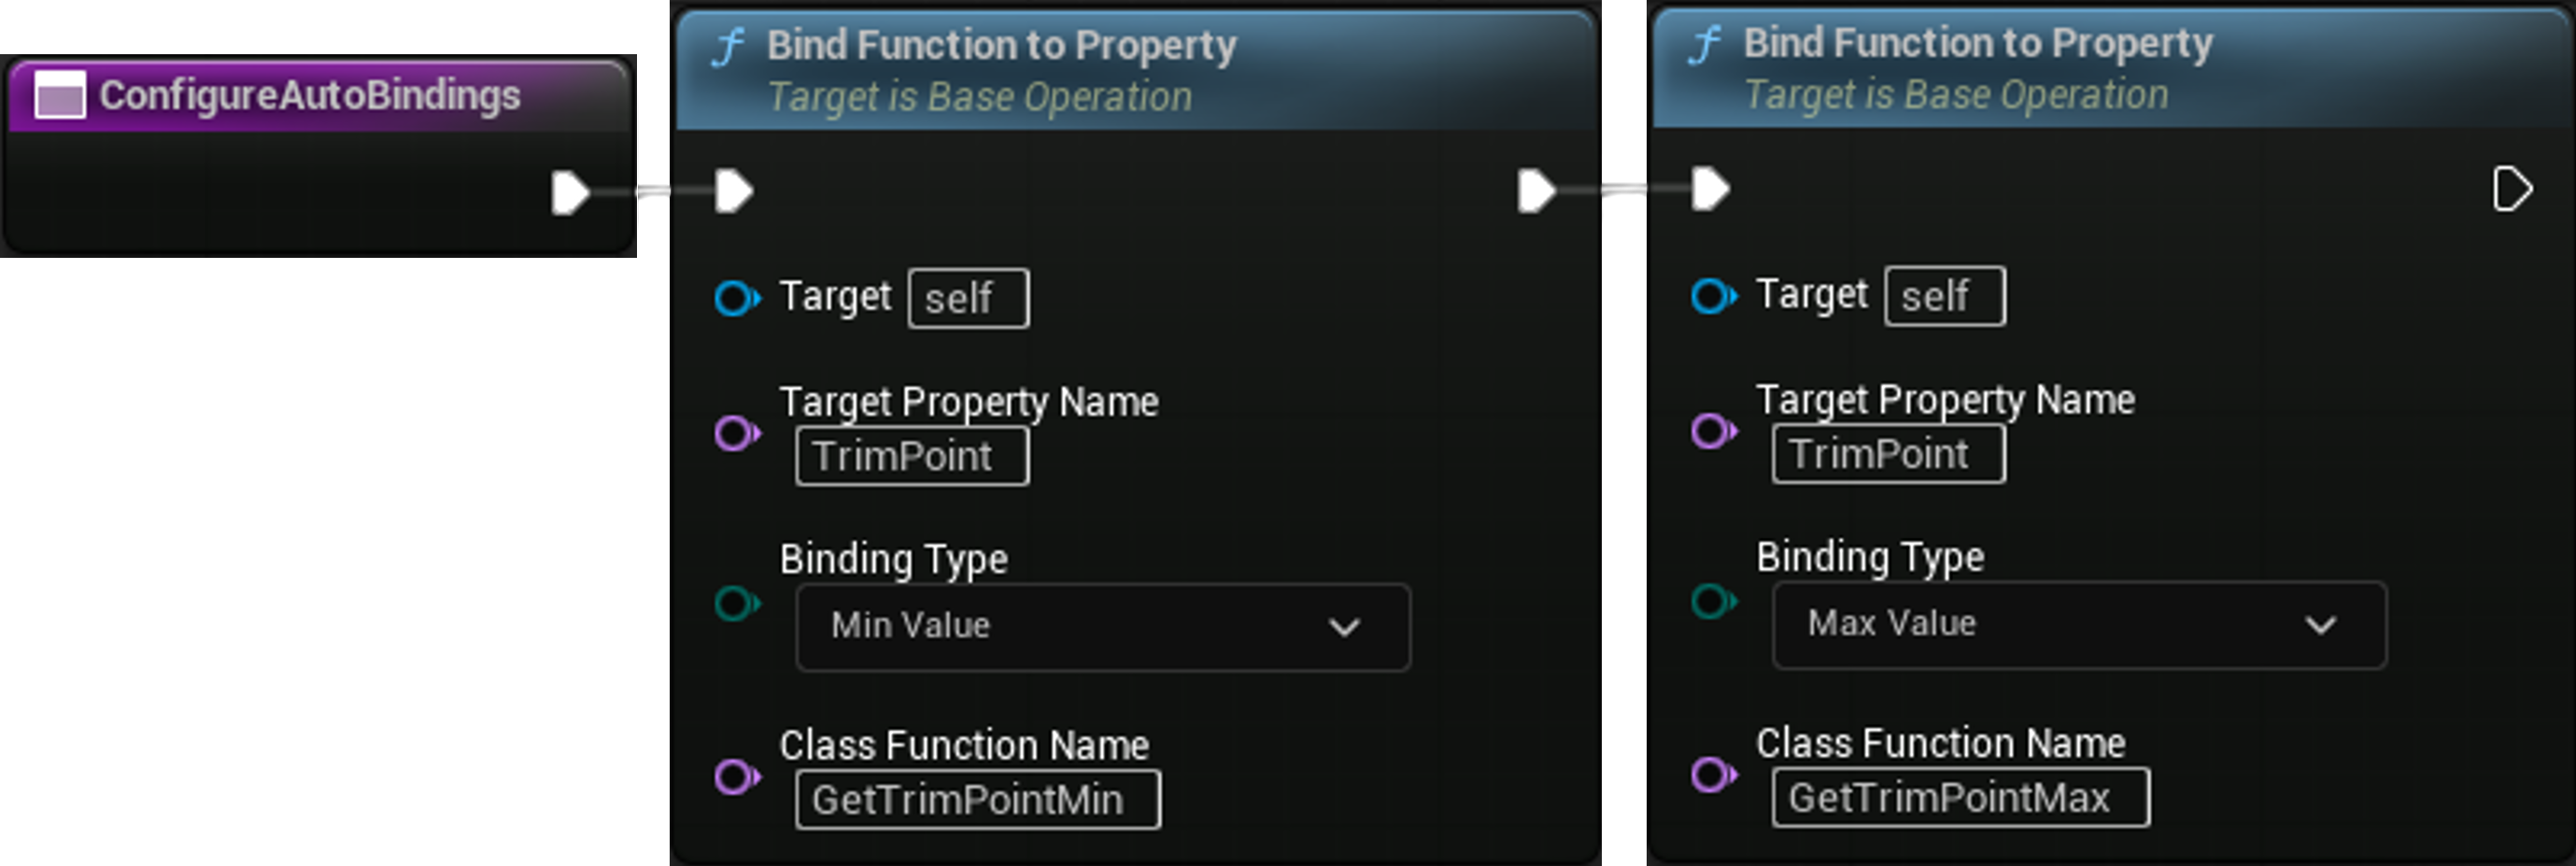
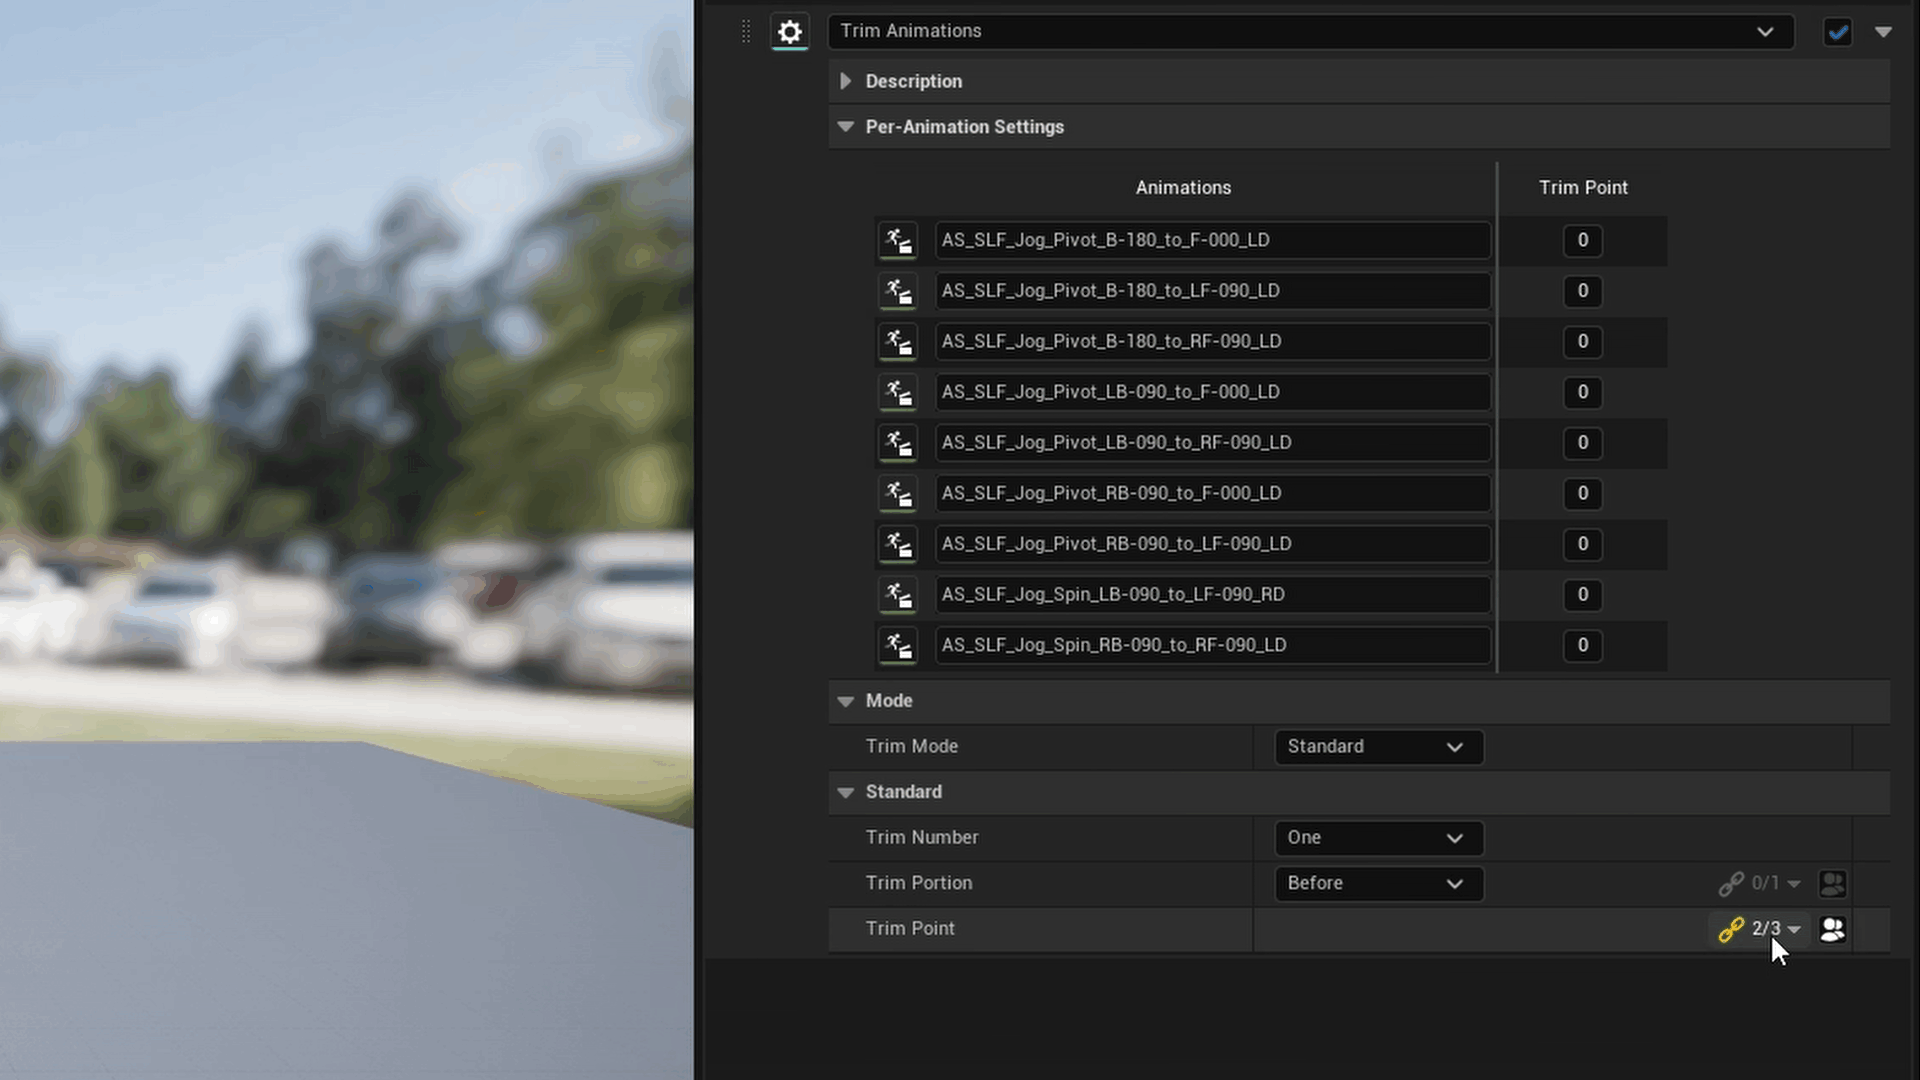
The result in the Editor is shown in the below gif. The two bound functions can be seen in a widget to the right of the TrimPoint property. Those functions are the same GetTrimPointMin and GetTrimPointMax functions set above. Their effect in this example is disallowing the user to set values beyond the Animation bounds.
So far, only two binding types of have been shown: min value and max value. However, there are four available, depending on the property type being bound to.
- Is Enabled: Controls whether a per-Animation editable property is enabled for editing in the Editor.
- Min Value: Sets the minimum allowed value.
- Max Value: Set the maximum allowed value.
- Should Filter: Controls whether an asset should be filtered in a picker. (This is only valid for children of
UObject.)

None need to be set via ConfigureAutoBindings. The widget allows bindings to be added manually after an Operation has been added to the Database. However, constantly needing to add bindings each time the same Operation is added to a new Database can be bothersome; hence, the benefit of ConfigureAutoBindings.
Careful With Property Access
Functions called by BindFunctionToProperty and BindPropertyToProperty must use special getters to access member variables.
Regarding the functions called within the BindFunctionToProperty and BindPropertyToProperty functions, if those functions --- such as GetTrimPointMin and GetTrimPointMax in the above example --- access member variables, some special care must be taken. Rather than accessing a member variable directly, as would normally be the case, member variables must be accessed using special getters. These getters are in the Operation Bindings subcategory within the Anim Tools category (and can rightly be accessed only within an Operation). For a C++ example demonstrating how one of these getters is used, refer to GetIntervalMin function of the Align Anim with Axis (UATAlignAnimWithAxisOperation) class.
All that said, it should be noted that ConfigureAutoBindings is optional, and bindings in general are optional.
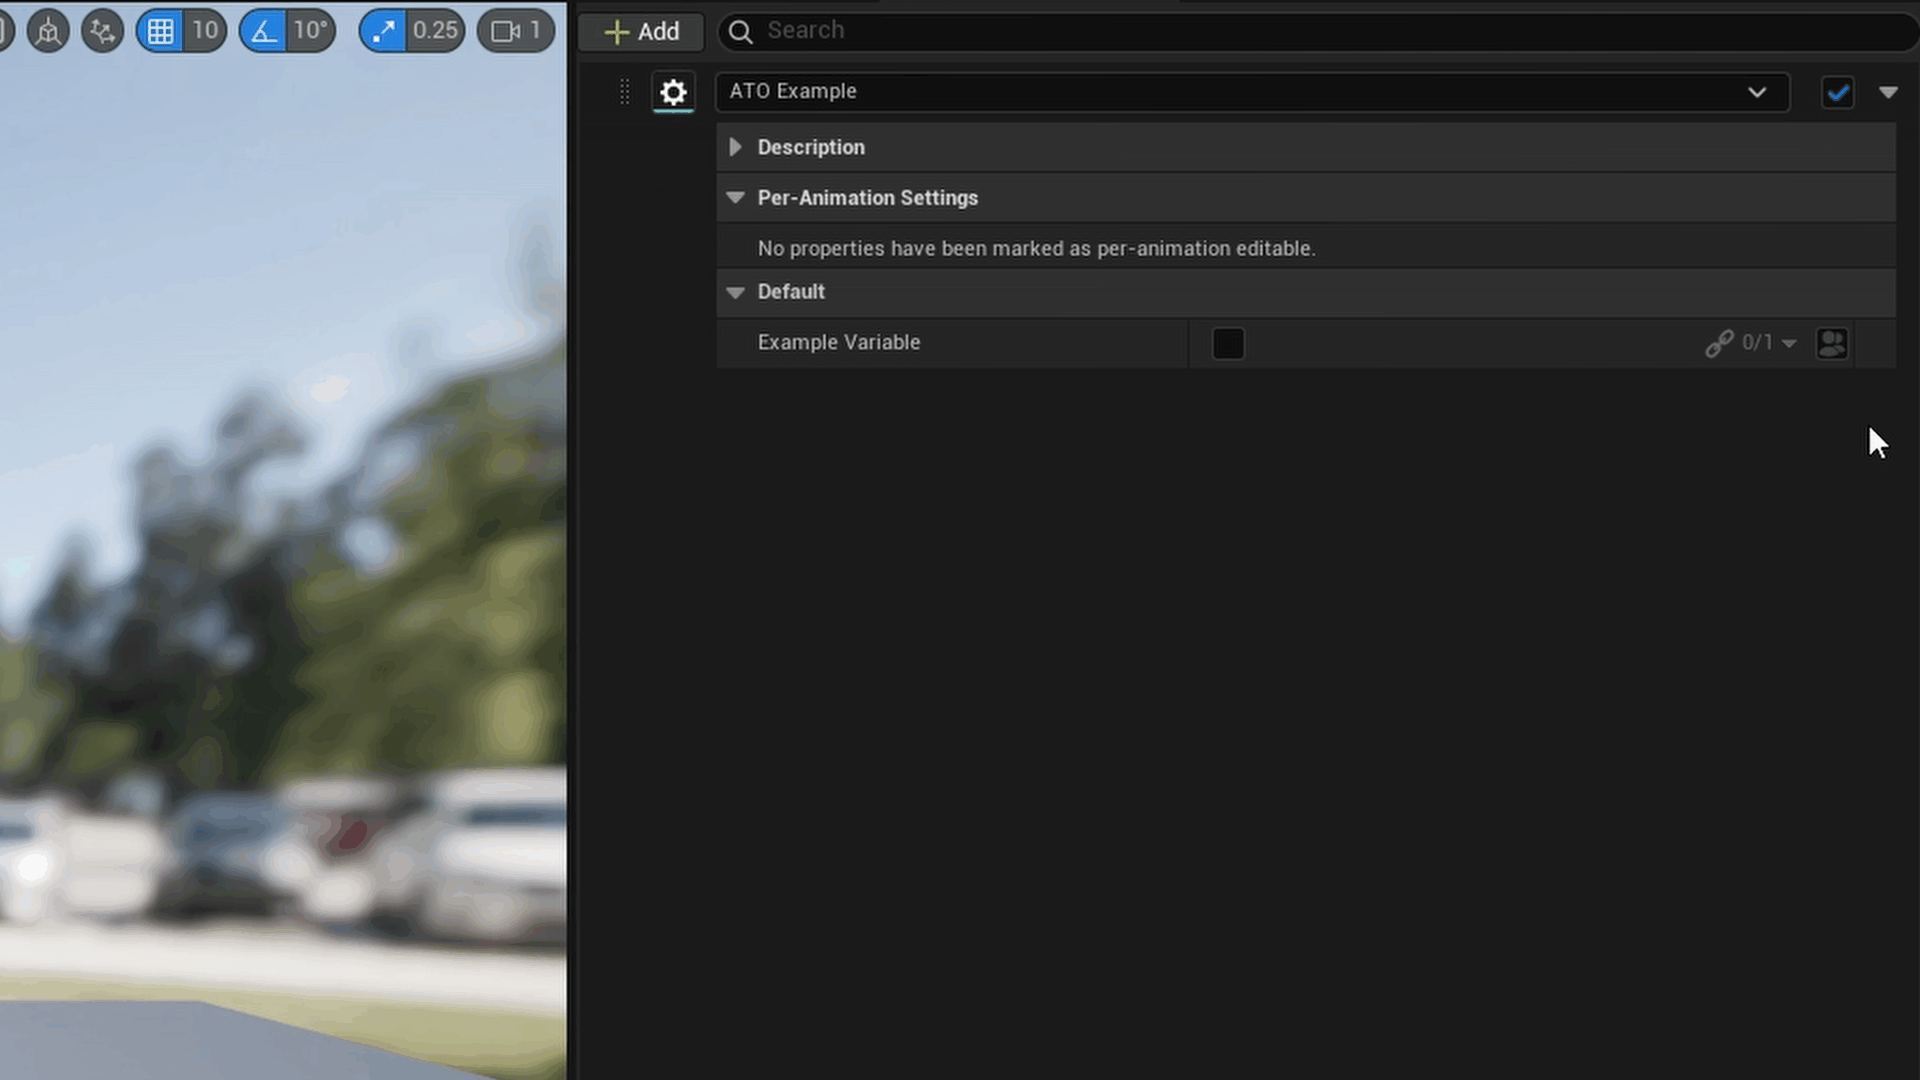
Per-Animation Control
Custom Metadata
In C++, the custom AllowPerAnimEdits and PerAnimEditCondition meta specifiers are used to trigger specific per-Animation control.
Operations support properties having per-Animation editability, meaning properties can have different values for each Animation. This grants fine-grained control so the user can tailor the select Operation to act in a relevant way on each Animation.
Not All Types Supported
Not all property types are supported for per-Animation editability. Currently, the following types are supported: bool, int32, float, double, uint8, int64, FIntPoint, FVector2D, FVector, FVector4, FRotator, and UObject.
For a Blueprint property to be eligible for per-Animation editability, it must be public and marked as bInstanceEditable = true; similarly, for a C++ property, it must be public or protected, marked as a UPROPERTY, specified as EditAnywhere, and given the custom metadata AllowPerAnimEdits. (In the case of Blueprint, for the property to appear at all in the Database's instance of the Operation, the aforementioned criteria must be met.)
The result, of course, is the ability to set different values of the property for each Animation.
Edit Condition
This freedom comes with another thing to consider, at least in the case of C++ implementation. That is, what about the EditCondition meta property? When a property is per-Animation editable, using the standard EditCondition will apply a blanket effect to all per-Animation editable properties displayed in the Per-Animation Settings grid.
 Often, however, we may desire the state of one (or more) per-Animation property to affect another per-Animation property in a granular way. Hence, the
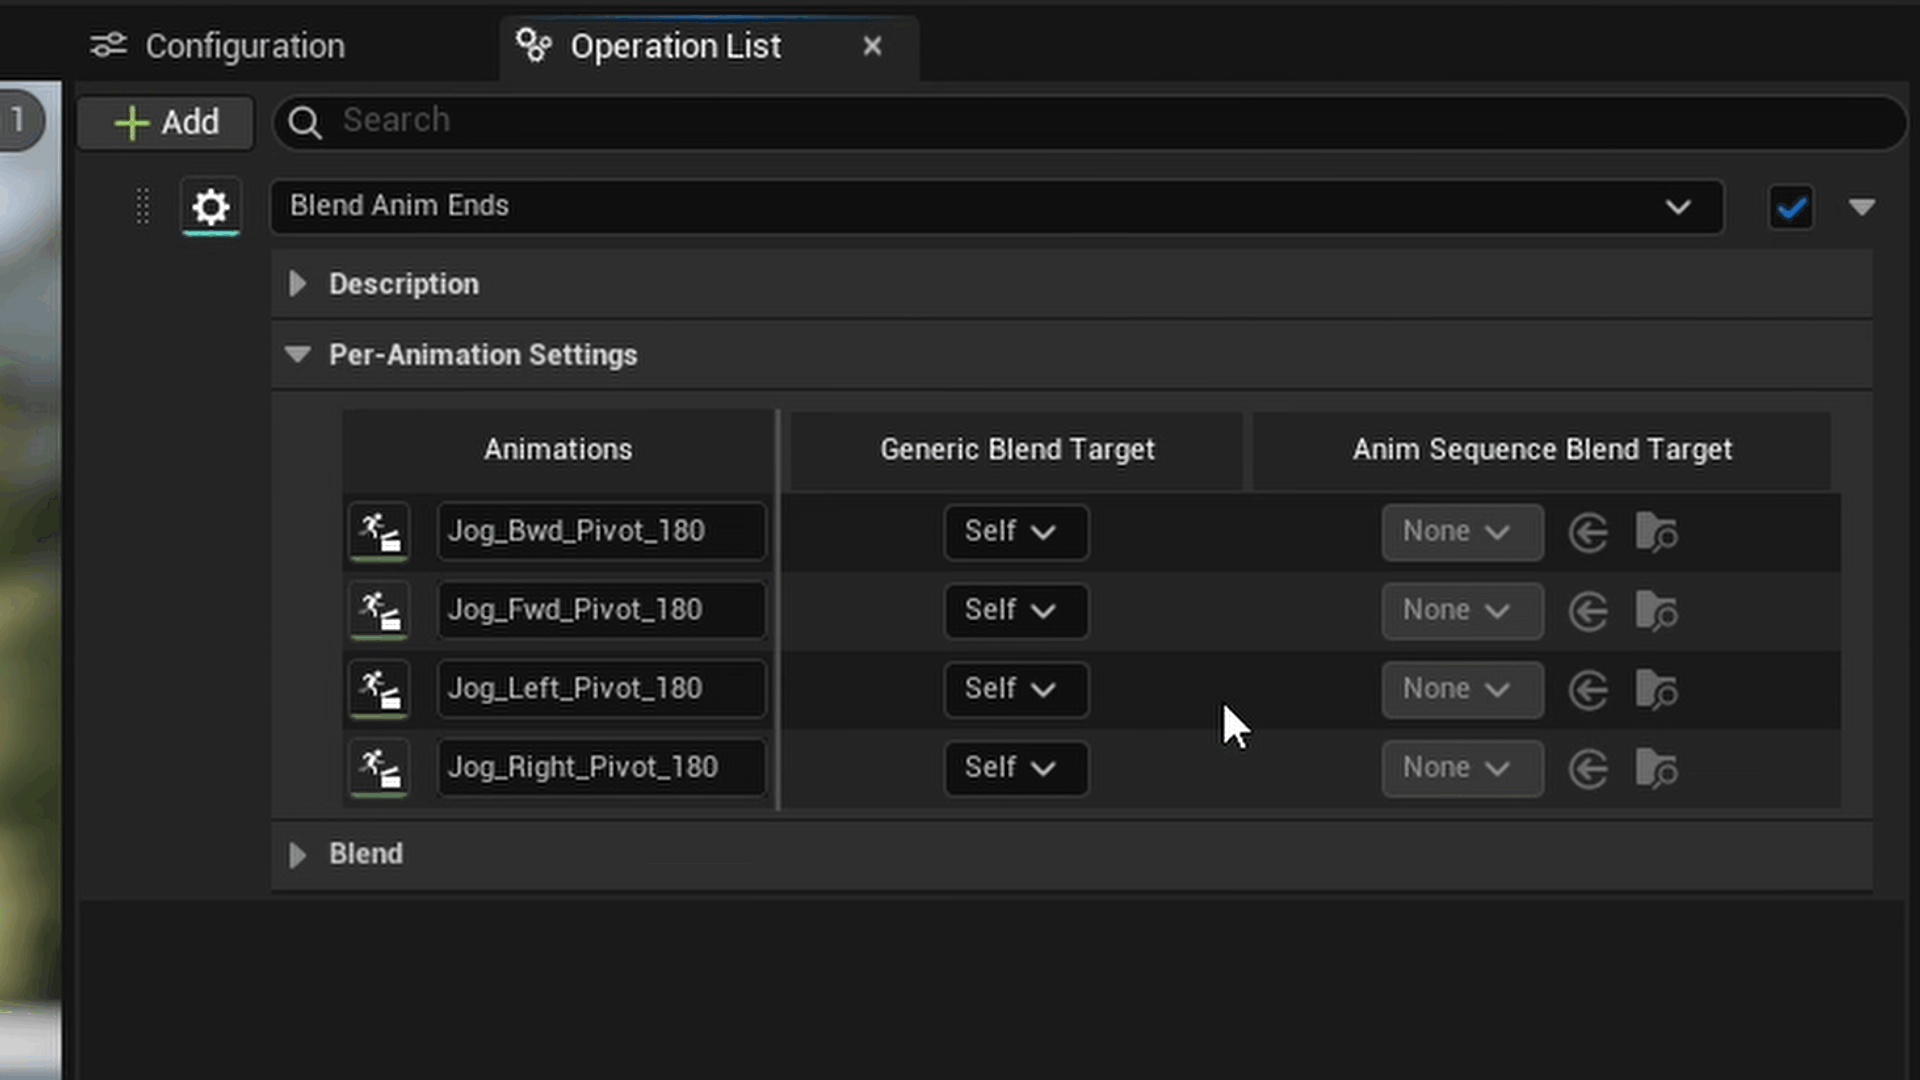
 PerAnimEditCondition is introduced. For example, the below code snippet is taken from the Blend Anim Ends Operation (i.e. UATBlendAnimEndsOperation).
    /** The generic target for blending.
     *  - Self: this Animation.
     *  - Other: a different select AnimSequence. */
    UPROPERTY(EditAnywhere, Category = "Blend", Meta = (AllowPerAnimEdits))
    EATBlendTarget GenericBlendTarget {EATBlendTarget::Self};

    /** The AnimSequence to blend to. (This, of course, is only relevant if BlendTarget = Other.) */
    UPROPERTY(EditAnywhere, Category = "Blend", Meta = (AllowPerAnimEdits, PerAnimEditCondition = "GenericBlendTarget == EATBlendTarget::Other"))
    TObjectPtr<UAnimSequence> AnimSequenceBlendTarget {nullptr};
PerAnimEditCondition is shown the corresponding gif.
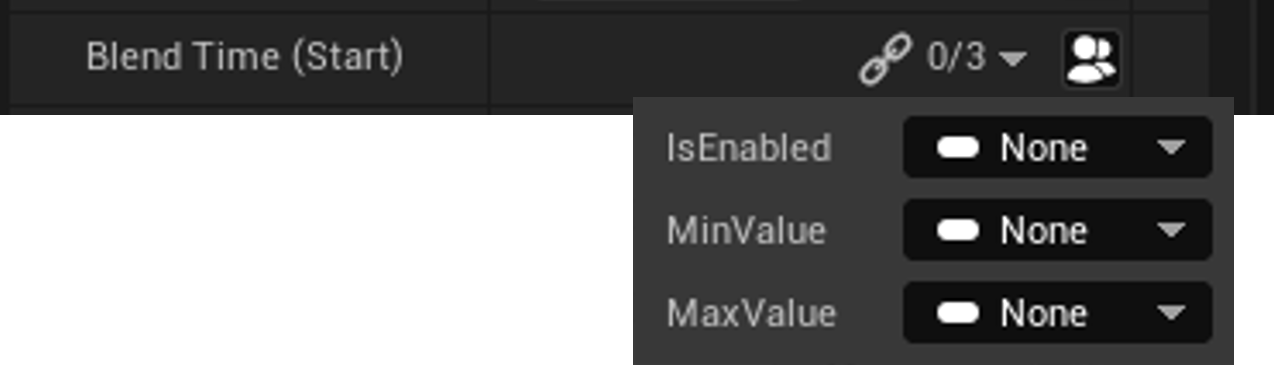
Bindings
Another method of controlling the behavior of per-Animation editable properties is through bindings. As shown to the right, when the per-Animation toggle is enabled, a dropdown can be clicked to reveal between one and three bindings options, depending on the property type. These affect the corresponding property as the binding name implies. In the pictured example, IsEnabled, MinValue, and MaxValue are available for the property, and each binding can be manually set to another member variable or function of the Operation class. (For auto-bindings, refer to the Configure Auto-Bindings section above.)
Conflicts
Do not use PerAnimEditCondition together with the IsEnabled binding on the same property, as it will likely cause conflicts.
The IsEnabled binding effectively does what the PerAnimEditCondition can do: it determines when a property is enabled (and therefore editable). Avoid using both on the same property. Since IsEnabled is obviously a bool, it can be bound either a bool class member variable or a pure function that returns bool.
The MinValue and MaxValue bindings dictate, as the names imply, the minimum and maximum values the corresponding property is allowed to take in the Per-Animation Settings grid. They can only be bound to member variables of the same type as the property in question or a pure function returning the same type as that property. For example, if MinValue and MaxValue are applied to a float property, only float properties or pure functions returning a float can be used as bindings.
Utility Libraries
Anim Tools includes utility libaries to accelerate the development of user-created Operations. The main libraries are the Math Library (UATMathLibrary) and Animation Library (UATAnimLibrary). These two libraries hold many useful functions intended to complement the default functions of Unreal, with the express intent of Animation modification. Many of the functions within the libraries have been used within the Operations that ship with Anim Tools.
Included Operations

As with the previous MoCap Tools (MCT) plugin, significant prebuilt and immediately applicable functionality is available within Anim Tools via the ready-to-use Operations.
Align Anim with Axis
The Align Anim with Axis Operation (i.e. UATAlignAnimWithAxisOperation) aligns the Animation (via the hips bone) and/or the root trajectory along a designated axis. A vector between the first and last key of the Animation (or selected interval) is created, and that vector is then rotated to align with the given axis, bringing the entire Animation and/or root trajectory with it. This functionality is primarily useful for animations meant to be straight-line movement, such as cut clips for F-000, R-090, L-045, etc.
Blend Anim Ends
The Blend Anim Ends Operation (i.e. UATBlendAnimEndsOperation) blends Animation ends together using select inertialization methods in the Local Space of the bones; that is, the Operation can ensure the first/last frame of an Animation matches
- the last/first frame in the same Animation,
- the first frame in another Animation, or
- the last frame in another Animation.
Thanks goes to Daniel Holden for inspiring this Operation. Be sure to check out his article for details.
Constrain Bones
The Constrain Bones Operation (i.e. UATConstrainBonesOperation) allows users to constrain select skeletal bones via:
- constraining each to another bone or set of bones, or
- constraining each via manual input.
This Operation can be used to, for example, constrain the root bone --- the simulation bone --- to the weighted-averaged ground-projected position of the hips, spine, and feet bones of motion capture data.
Constrain IK
The Constrain IK Operation (i.e. UATConstrainIKOperation) is meant as a "quick fix" Operation to constrain IK bones to FK bones for skeletons that follow the Unreal standard naming convention for IK and FK bones. If this Operation does not work as desired, please refer to the Constrain Bones Operation, which is more detailed and complete and will allow the constraint any bone, including IK, to any other bone.
Copy Motion (Experimental)
Solid Application of Copy Motion?
Does anyone know how to apply the Copy Motion anim node in a way to produce the results Epic showed in their demonstration? If so, please let me know, that way I can update this Operation.
The Copy Motion Operation (i.e. UATCopyMotionOperation) is inspired by Epic's experimental Copy Motion anim node (FAnimNode_CopyMotion), described in this article. The Operation is, of course, an offline version of the FAnimNode_CopyMotion class provided by Epic, but the core features are present. Essentially, the Operation, as with the anim node, "generates an additive transform for a specific bone based on some input poses, optionally in the space of another bone," and then allows that additive transform (internally called the TransformOffset) to be scaled and reoriented prior to its application.
This Operation is currently experimental because the output is not of the same level of quality as what Epic showed in their demonstration.
Curve to Root Motion (Experimental)
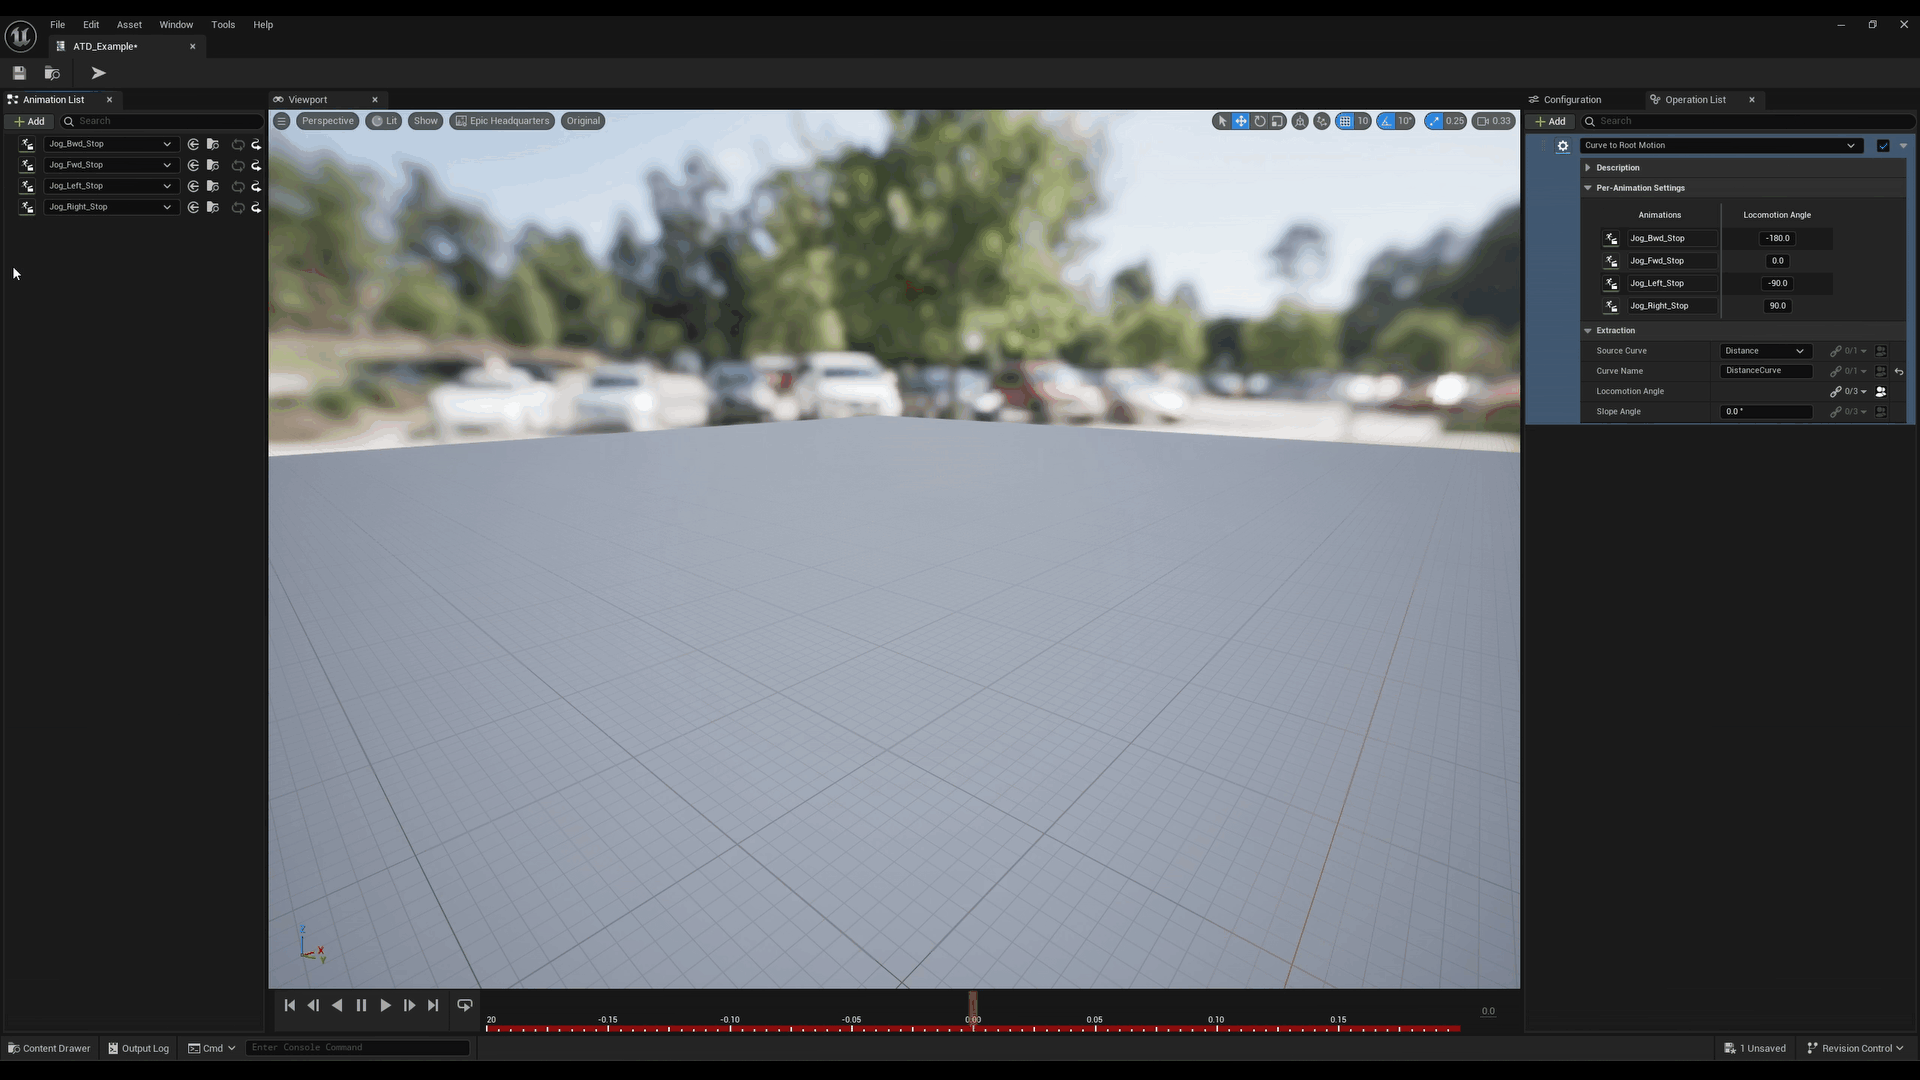
The Curve to Root Motion Operation (i.e. UATCurveToRootMotionOperation) extracts distance or speed curve data from an Animation's float curves and generates root motion. The above gif demonstrates the results when the Operation is applied to the Stop-state Animations from Gideon (the character from Paragon).
Generate Root Bone Curves
The Generate Root Bone Curves Operation (i.e. UATGenerateRootCurvesOperation) generates specified float curves for the root bone of the Animations, placing a curve key at every anim key. The exact curves that can be generated are distance, speed, velocity, acceleration, jerk, and locomotion angle. All curves, aside from the distance curve, are generated relative to pseudo-Component space --- the space the simulation object (i.e. Capsule) would dictate at runtime. (This is done so curves representing vector-related values "point" in the "intuitive" direction and can be used as such as runtime.) This, of course, requires MeshForwardAxis and MeshUpAxix to be correctly populated in the Configuration tab.
The distance curve is created following Paragon's convention, as shown by Laurent Delayen, and is therefore monotonic increasing. There are three options: FromMarker, ToMarker, ToAndFromMarker.
FromMarkerwould be used for a Start-state Animation, where the character is moving away from some point in the world.ToMarkerwould be used for a Stop-state Animation, where the character is moving toward some point in the world.ToAndFromMarkerwould be used for a Pivot-state Animation, where the characater is changing direction --- he is moving toward a point and then away from it.
For derivative curves, there are two options for generation: central finite-difference and Savitzky-Golay. Each option has its strength. Choose what works best.
Remove Root Offset
The Remove Root Offset Operation (i.e. UATRemoveRootOffsetOperation) removes the root bone's offset relative to the root bone's transform at the specified anim key. That is, if 0 is the selected anim key, the entire Animation will be shifted such that the start of the Animation is at the World origin, for example.
Retime Anims for Blendspace
The Retime Anims for Blendspace Operation (i.e. UATRetimeOperation) prepares locomotion-specific Animations to blend within Blendspaces. However, since the algorithm is not magical, the Animations must adhere to the below criteria; otherwise, all sorts of unaesthetic things will likely result.
- Sync markers corresponding to foot steps MUST be present on ALL Animations.
- Animations must have the same number of foot steps (and therefore sync markers) for each foot. (The number of steps of the right foot must be the same across all selected Animations, and the number of steps of the left foot must be the same across all Animations.)
- The locomotion gait must be the same; that is, the Animations must be all walking, or all jogging, etc.
- The animations must share the same locomotion state: start, stop, loop, pivot, etc.
Internally, the Operation creates a time mapping from the original sync marker positions within the Animations to the averaged target positions, then resamples every anim key by interpolating from the original Animation at the mapped source time. To account for the issue of the root bone's trajectory stretching and squeezing in response to the retiming, there is the Retime And Adjust Root And Stride option that readjusts the root trajectory to enforce that it maintains its original "character," after which stride warping is applied to account for the delta.
Smooth Bone Trajectory
The Smooth Bone Trajectory Operation (i.e. UATSmoothBoneTrajectoryOperation) smooths a bone's trajectory using one of four methods: Linear, Moving Average, Savitzky-Golay, or Adaptive Spline. Since three of the four options create edge artifacts, mitigation measures are made available via the Pre-Extrapolation and Post-Extrapolation variables, which can be set as Constant, Linear, Quadratic, Looping, or Periodic --- where Periodic is highly experimental.
Trim Animations
The Trim Animations Operation (i.e. UATTrimOperation) trims Animations at one or two designated anim keys. If a single anim key is selected, the Animation can either be trimmed before or after the designated anim key, preserving the selected anim key --- i.e. not trimming the selected key. If two keys are selected, the portion between the two keys, inclusively, is preserved and the borders are removed.
Experimental Features
Control Rig
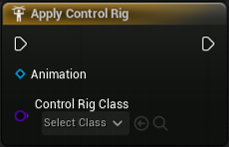
The ApplyControlRig node accepts any Control Rig class and applies is directly to every frame of the input Animation (UATAnimation). This node was created upon special request from a friend. Though it seems to function well, it does not currently support input parameters.
Potential updates may include functionality to pass in parameters via pins. Additionally, if possible, a per-key version of the node could be created --- or could replace the current version. Much of this depends on user feedback.
Anim Nodes
Set the Skeletal Mesh
In order for the internal workings of the Anim Node wrapper to work, a skeletal mesh must be applied to the Anim Sequence assets be used.
The Anim Tools Anim Node is highly experimental. Due to how real anim nodes work within the Anim Instance and Anim Graph, it is doubtful the full functionality of anim nodes can ever be brought into Anim Tools, particularly for anim nodes that depend on World time and other information. Currently, the anim nodes that seem to function are those that don't depend on information that would otherwise be fed into it via the Anim Graph. In my experience, simple IK nodes and layering nodes seem to work fine.
Feedback is appreciated on this experimental feature.
F.A.Q.
- How is Anim Tools different from a simple Anim Modifier?
- A non-destructive workflow is permitted.
- Multiple animation assets can be analyzed at once, allowing for the extraction of statistical data.
- Modifications can be previewed in the viewport.
- Select Anim Nodes can be applied via the experimental Anim Node wrapper node.
- Control Rig can be directly applied via the experimental Control Rig wrapper node.
- Extensive function libraries and function built into the Animation (
UATAnimation) class streamline the workflow.